lab-guides
Delphix lab exercises for use with LabAlchemy hands-on labs
Delphix Admin Training for Oracle Virtualization
LAB GUIDE
Table of Contents
-
Exercise 3 – Validate the Source and Target Environment with Hostchecker
-
Optional Advanced Exercise – Discover and Link a 12c Container Database dSource
-
Optional Advanced Exercise – Measure Network Performance Test through the CLI
Background
This guide will get you started with Delphix's virtualization for Oracle. You will learn how to to securely copy and share datasets. Using virtualization, you will ingest data from sources and create virtual copies, which are full read-write capable database instances that use a small fraction of the resources a normal database copy would require.
Delphix Virtualization’s functionality is exposed through two interfaces: management/admin and self-service. Through the management/admin interface (the topic of this guide), DB administrators connect to source datasets and create resources such as virtual databases. Through the self-service interface, non-admin users can operate on data provided by administrators. A guide for self-service can be found here.
We also provide a guide for Delphix masking, and for other virtualization data sources such as MS SQL and postgresql.
Getting Started
Welcome to the Delphix Admin Training for Oracle Lab Guide
This guide is a supplement to the Delphix Admin Training for Oracle course, and provides several exercises to perform throughout the class. If you encounter any issues during the exercises, please do not hesitate to ask your instructor for advice.
Lab Requirements
In order to perform these lab exercises, you will need:
- A modern HTML5 capable web browser (IE9+, Chrome, Firefox, Safari)
The Delphix Admin Training Cloud Lab
Your instructor should have provided you with a Class Name and a Student Number. In order to access your lab server, point your web browser to: http:// classname.agile.today/ studentnumber
For example, if your Class Name is "acmetech" and your Student Number is 5 , you would go to the site: http://acmetech.agile.today/5
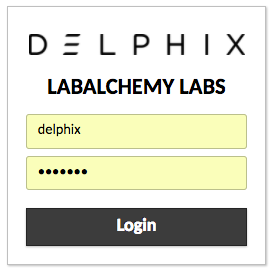
At the login screen, enter the username and password: delphix/delphix
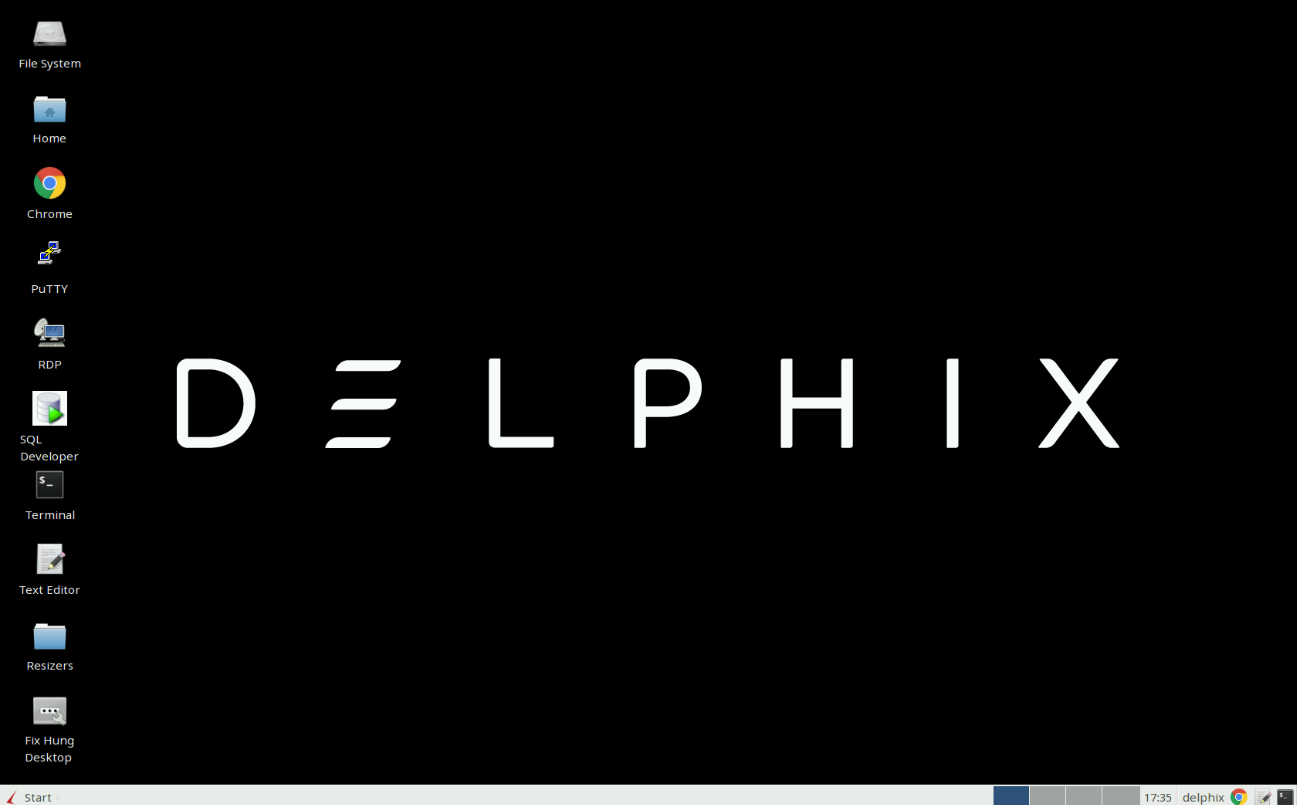
Once you have logged in, you will be connected to your lab server. This server contains everything you will need to perform your lab exercises including:
- Terminal with SSH (or Putty) to connect to Linux source/target database servers
- Chrome Web Browser to connect to your Delphix Data Platform
- A copy of this lab guide
- Notepad for class notes
- Oracle SQL Developer for remote connections
IMPORTANT NOTE: Do not use the "Log Out" function on your lab server. If you do, it will break your lab connection.
Important IP Addresses
| Host | IP |
|---|---|
| Delphix Data Platform | 10.0.x.10 |
| Linux Source | 10.0.x.20 |
| Linux Target | 10.0.x.30 |
In the above IP addresses, the x denotes your Student Number. For example, if your student number is 5 , your Delphix Data Platform will be located at 10.0. 5.10.
Cloud Lab Usernames and Passwords
| User | Password |
|---|---|
| Initial Delphix sysadmin | sysadmin |
| Initial Delphix admin | delphix |
| Source and Target delphix user (via SSH) | delphix |
| Source and Target oracle user (via SSH) | delphix |
Paths
| Object/Tool | Path |
|---|---|
| hostchecker (after tar extraction) | /home/delphix/hostchecker |
| Oracle XE 11g ORACLE_HOME | /u01/app/oracle/product/11.2.0/xe |
| Toolkit | /u01/app/toolkit |
Lab Exercises
Perform these exercises when instructed by your Delphix Instructor.
</br>
Exercise 1 – Logging into the Delphix Engine UI
In this exercise, you will:
- Access the Delphix Data Platform GUI as the Delphix admin user
- Access the Delphix Data Platform Setup GUI as the sysadmin user
Context
The Delphix virtualization GUI has two layers: management and setup. The management GUI is accessed by admins who control data assets and objects. The setup GUI is controlled by sysadmins who manage the engine and create new admin users.
Alternatively, the engine can be controlled through the CLI or APIs.
Steps
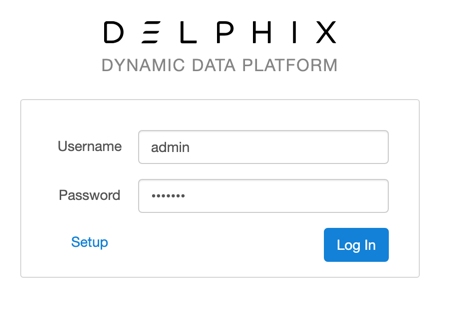
- Connect to your Delphix Engine using Chrome on your lab server (see the Important IP Addresses section of the Getting Started guide above). The IP address will be 10.0.x.10, where "x" is your Student Number
- Login to the Delphix Dynamic Data Platform using the username admin and password delphix
-
Click Log In
- In order to become more familiar with what is available here, browse around the various sections of the landing page.
- Click admin on the upper right side and logout
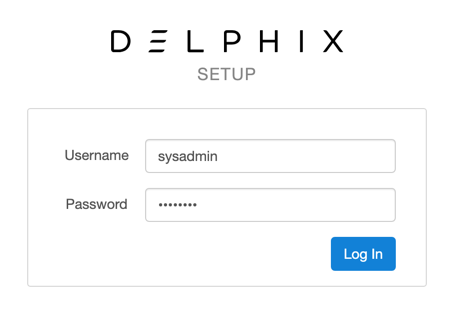
- Click Setup (Located under Password) to navigate to Delphix Setup login
- Login to Delphix Setup using the username sysadmin and password sysadmin
-
Click Log In
- In order to become more familiar with what is available here, browse around the various sections of the landing page.
Related Links
The admin and sysadmin User Roles
Setting Up the Delphix Data Platform
</br>
Exercise 2 – Create the "delphix_db" User
In this exercise, you will:
- Create a Delphix DB User on your source database
Context
Delphix requires access to database users with certain privileges. These are configured through automated scripts.
Steps
- Use the Terminal app on your Jumpbox desktop to connect into your Linux Source (see the Important IP Addresses section of the Getting Started guide above).
- Type ssh 10.0.x.20 (where "x" is your Student Number)
- Extract the hostchecker_linux_x86.tar file in your home directory
- Type ls -ltr
- Type tar -xvf hostchecker_linux_x86.tar
- Navigate to the hostchecker directory
- Type cd hostchecker
- Type ls -ltr (observe the files present in this folder, as we will be using them again)
- Set the Oracle environment variables below:
- Type export ORACLE_HOME=/u01/app/oracle/product/11.2.0/dbhome_1
- Type export ORACLE_SID=orcl
- Note: ". oraenv" can be used to set the environment variable rather than export commands
- Run the script to create the delphix_db user
- Type ./createDelphixDBUser.sh
- Use the following details during the running of this script:
- The user will be created in the default instance orcl. This is set by the environment variable ORACLE_SID. Press Enter to accept the default database instance orcl
- Delphix DB User Username:delphix_db
- Delphix DB User Password: delphix_db
- Decline the SELECT ANY DICTIONARY privilege. This is a sweeping privilege that is not required, but optional
-
Type: n and press Enter

The script should create the user without error.
</br>
Exercise 3 – Validate the Source and Target Environment with Hostchecker
In this exercise, you will:
- Use the hostchecker program to run validation tests on your Linux Source
- Use the hostchecker program to run validation tests on your Linux Target
Steps to Validate the Source Environment with Hostchecker
- Connect to your Linux Source by opening Terminal on your Lab Server
- Type ssh 10.0.x.20 ('x' will be your Student Number ).
- Set the Oracle environment variables below:
- Type export ORACLE_HOME=/u01/app/oracle/product/11.2.0/dbhome_1
- Type export ORACLE_SID=orcl
- Type export PATH=$ORACLE_HOME/bin:$PATH
- Ensure you are inside the hostchecker location
- Type cd /home/delphix/hostchecker
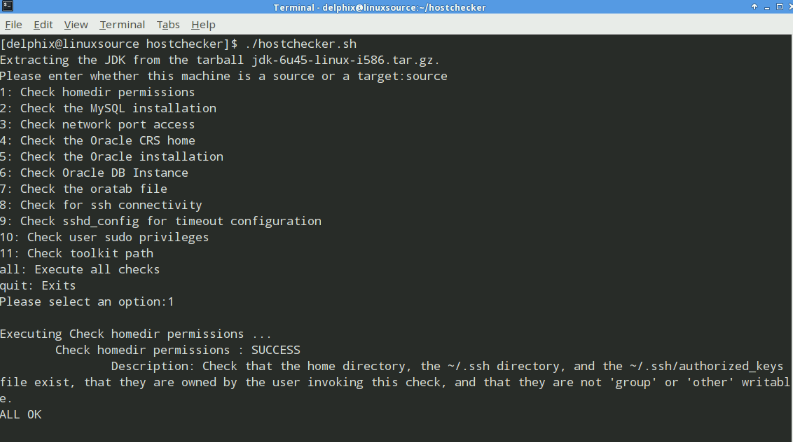
- Run Hostchecker utility
- Type ./hostchecker.sh
- Indicate that this machine is a source
- Type source
- Review the available checks that can be run on this system
- Type 1 and press Enter
-
The script will check homedir permissions and return SUCCESS and ALL OK
-
- Type 3 and press Enter
- Enter an IP address of: 10.0.x.10 ('x' will be your Student Number ).
- Enter the port: 8415
- The script will test the port and return SUCCESS and ALL OK.
- Repeat option 3 for the following ports: 8341 and 873
- Type 5 and press Enter
- Type 5 to select the ORACLE_HOME associated with the 'orcl' database (/u01/app/oracle/product/11.2.0/dbhome_1), and press Enter
- The script will test the Oracle Home and return SUCCESS and ALL OK
- Type 6 and press Enter
- Type 3 to select the Oracle Instance associated with the 'orcl' database, and press Enter
- Provide the Oracle home path at the prompt: /u01/app/oracle/product/11.2.0/dbhome_1
- Enter the username and password of the Oracle database user created in exercise 2 (Username: delphix_db and Password: delphix_db or the credentials provided above)
- The script will test the Oracle Instances and return SUCCESS and ALL OK
- Type 7 and press Enter
- The script will test the /etc/oratab file and return SUCCESS and ALL OK
- Type 8 and press Enter
- Enter a password of: delphix
- The script will test the SSH connectivity to the host and return SUCCESS and ALL OK.
- Type 9 and press Enter
- The script will return a WARNING due to permissions. This is normal.
- Type 10 and press Enter
- Enter a password of: delphix
- The script will test sudo privileges and return SUCCESS and ALL OK
- Type 11 and press Enter
- Enter a path of: /u01/app/toolkit
- The script will test the path and return SUCCESS and ALL OK
- Type quit to exit hostchecker.
Were all tests successful? If not, which ones failed and why?
Note: In a production installation, the sshd_config test will return a WARNING response due to permissions on the file. If hostchecker is run as root, for this test, it will perform the test properly.
Steps to Validate the Target Environment with Hostchecker
- Connect to your Linux Target A by opening Terminal on your Lab Server
- Type ssh 10.0.x.30 ('x' will be your Student Number ).
- Extract the hostchecker_linux_x86.tar file in your home directory
- Type ls -ltr
- Type tar -xvf hostchecker_linux_x86.tar
- Ensure you are inside the hostchecker location
- Type cd /home/delphix/hostchecker
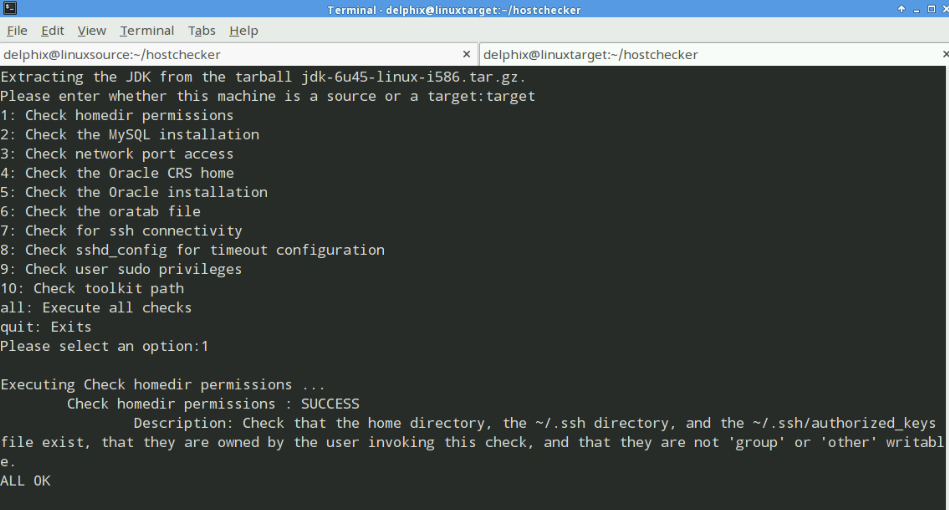
- Run Hostchecker utility
- Type ./hostchecker.sh
- Indicate that this machine is a target
- Type target
- Review the available checks that can be run on this system
- Type 1 and press Enter
-
The script will check homedir permissions and return SUCCESS and ALL OK
-
- Type 3 and press Enter
- Enter an IP address of: 10.0.x.10 ('x' will be your Student Number ).
- Enter the port: 8415
- The script will test the port and return SUCCESS and ALL OK.
- Repeat option 3 for the following ports: 873, 22, 80 and 443
- Type 5 and press Enter
- Type option 4 select the current ORACLE_HOME value, and press Enter
- The script will test the Oracle Home and return SUCCESS and ALL OK
- Type 6 and press Enter
- The script will test the /etc/oratab file and return SUCCESS and ALL OK
- Type 7 and press Enter
- Enter a password of: delphix
- The script will test the SSH connectivity to the host and return SUCCESS and ALL OK.
- Type 8 and press Enter
- The script will return WARNING due to permissions. This is normal.
- Type 9 and press Enter
- Enter a password of: delphix
- The script will test sudo privileges and return SUCCESS and ALL OK
- Type 10 and press Enter
- Enter a path of: /u01/app/toolkit
- The script will test the path and return SUCCESS and ALL OK
- Type quit to exit hostchecker.
If you have completed all of the checks and they have returned SUCCESS and ALL OK, you have completed this exercise.
Note: In a production installation, the sshd_config test will return a WARNING response, due to permissions on the file. If hostchecker is run as root, for this test, it will perform the test properly.
</br>
Exercise 4 – Add a Source Environment
In this exercise, you will:
- Connect Delphix to your Source Oracle Database server
- Create a Source Environment
Context
Before users can create their own virtual databases, Delphix needs to connect to source data. In Delphix, an environment is a host that runs database software. For example, a Linux system running Oracle. The environment is where the Delphix engine will search for available data sources. Credentials to access the host need to be provided while configuring an environment.
Steps
- Log into the Delphix Data Platform UI as the admin user and the password that was set during the Engine setup.
- Note: If you forgot your admin password, please ask your lab administrator to reset it.
- Click the Manage menu and select Environments from the list
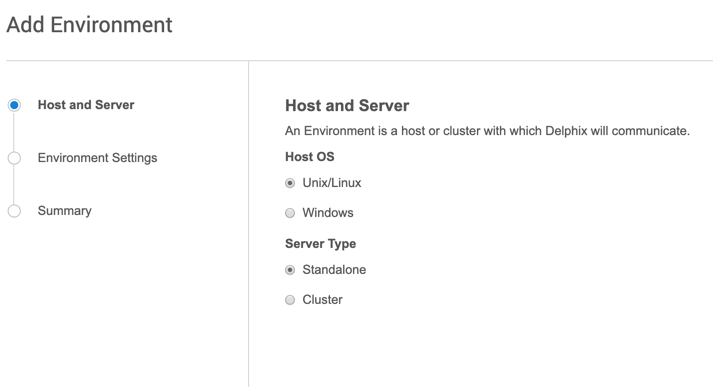
- Click the ellipses ( … ) next to Environments then choose Add Environment
- On the Host and Server select the following:
- Host OS: Unix/Linux
-
Server Type: Standalone
- For Environment Settings, provide the following information
- Environment Name: Source
- Host Address: 10.0.x.20 ('x' will be your Student Number )
- NFS Addresses: 10.0.x.20 ('x' will be your Student Number )
- Leave the DSP fields blank
- Set Login Type to Username and Password
- OS Username: delphix
- OS Password: delphix (Note: Enter the Toolkit Path before Validating the Username and Password)
- Toolkit Path: /u01/app/toolkit
-
Click Validate

- Click Next
- Click Submit
-
You can view the status of the environment creation and discovery by clicking on the Actions menu on the top right-hand side of the page. Clicking on a job in the Actions pane will allow you to track its progress.

</br>
Exercise 5 – Link a dSource
In this exercise, you will:
- Create an Oracle dSource by syncing with your Source Oracle Database
- Create a Delphix Group to hold your dSource object
Context
With an environment set-up, users can then sync databases into Delphix. The Delphix engine will read the source database and create a dSource (a custom object). The dSource is not a functional image of the database but a storage-efficient object from which virtual databases can be created. When creating a dSource, Delphix will pull over the complete data set using standard database protocols. Subsequent sync operations, as governed by user-defined policies, will pull only incremental changes. At the end of each sync operation, a snapshot is created that serves as the base point for provisioning operations. These sync operations are called SnapSync. Additional details on sync functionality can be found here.
Steps
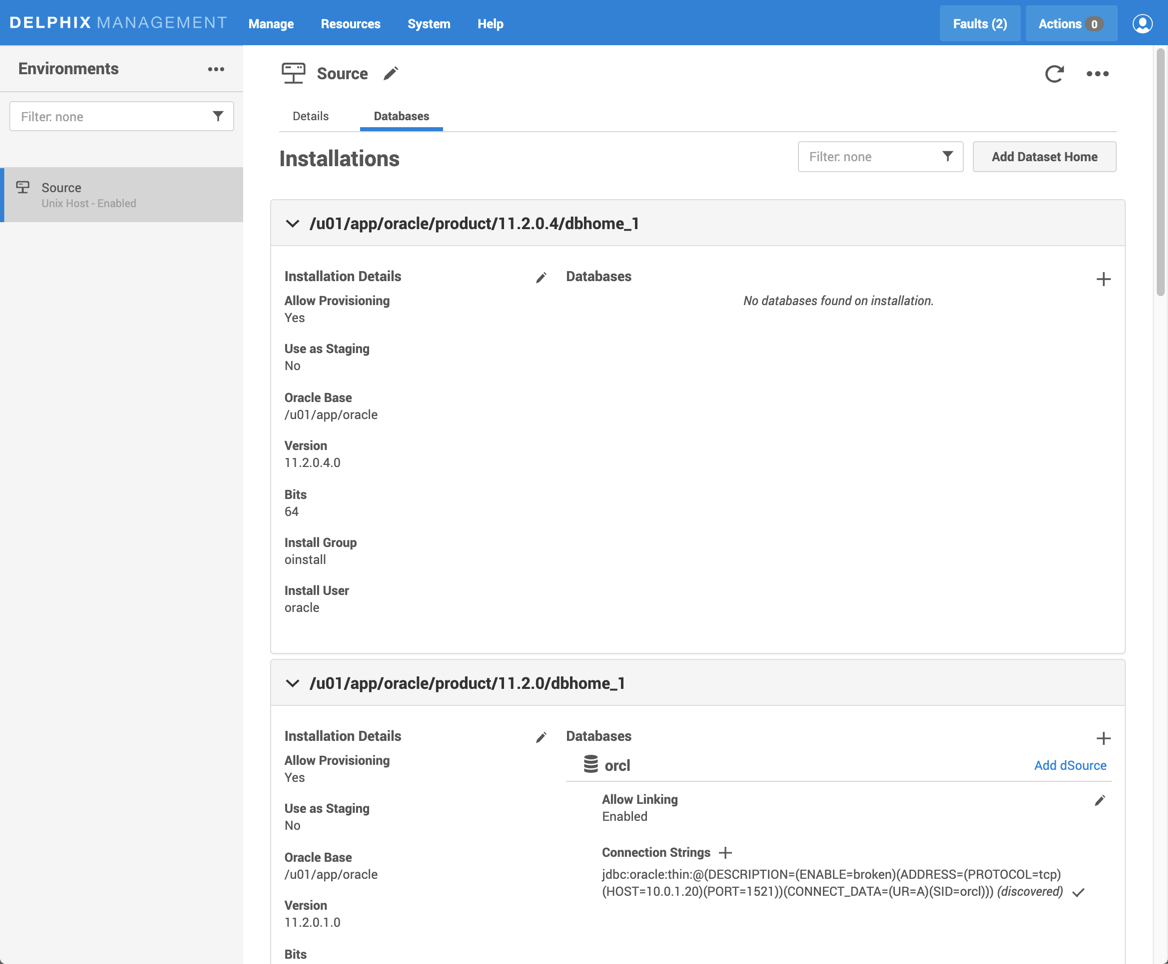
- View the Environment details
-
Click on the Environment on the left on review information on the Details tab
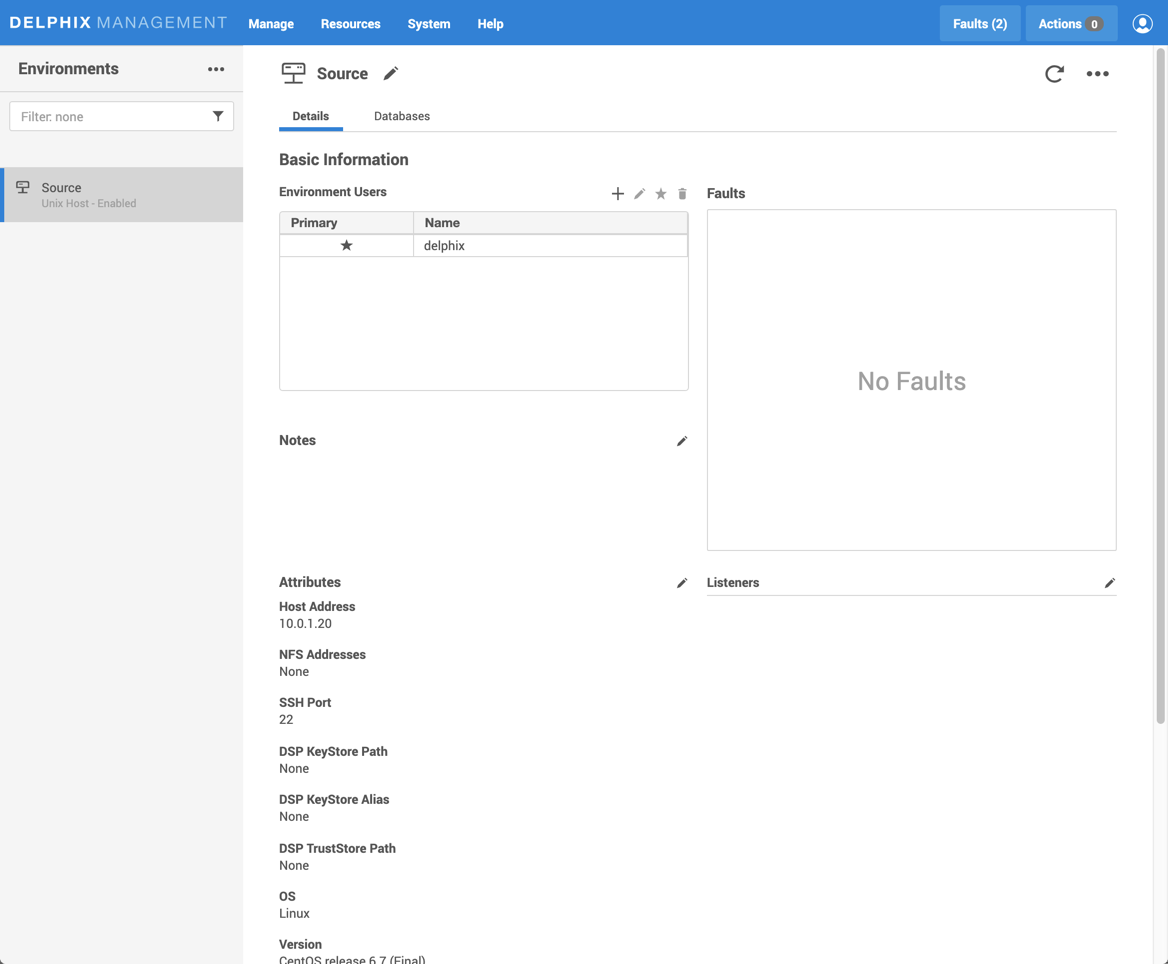
-
-
Click on the Databases tab to view any discovered database installations and databases
- Link the orcl database
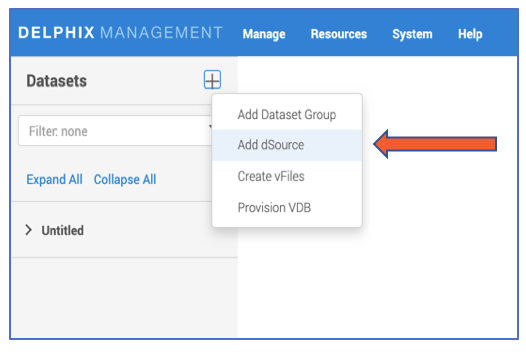
- On the top menu, click the Manage menu and then Datasets
-
Click the + next to Datasets on the top left portion of your screen and then select Add dSource
- The Welcome page for the dSource Wizard will be displayed. Review the instructions to get an overview of the process and click Next
- In the Source tab select the orcl Data source and provide the username and password of the database user (user and password are both delphix_db)
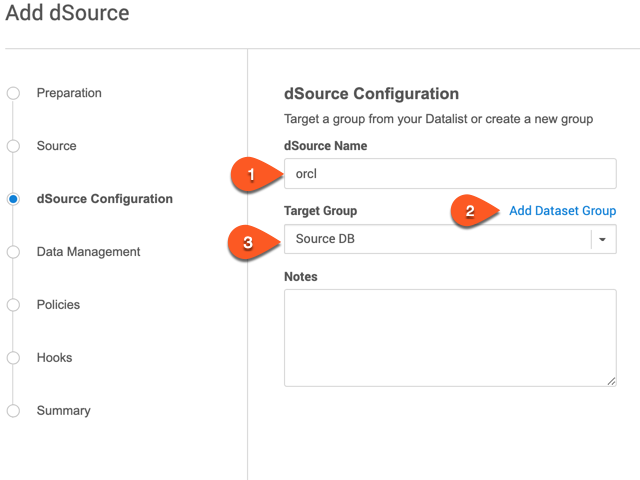
- Under the dSource Configuration tab we will provide a user-friendly name for the dSource and create a new Dataset Group to place it in.
- Enter orcl for the dSource Name
-
Click on the Add Dataset Group link and enter Source DB in the Name field.
- Click Next
- On the Data Management tab accept the defaults
- Initial Load: Immediately
- LogSync: Enable Archive + Online Redo
- Click Next
- Accept the Default SnapSync and Retention policy setting
- Click Next
- Accept defaults for the Hooks. No Hooks will be used.
- Click Next
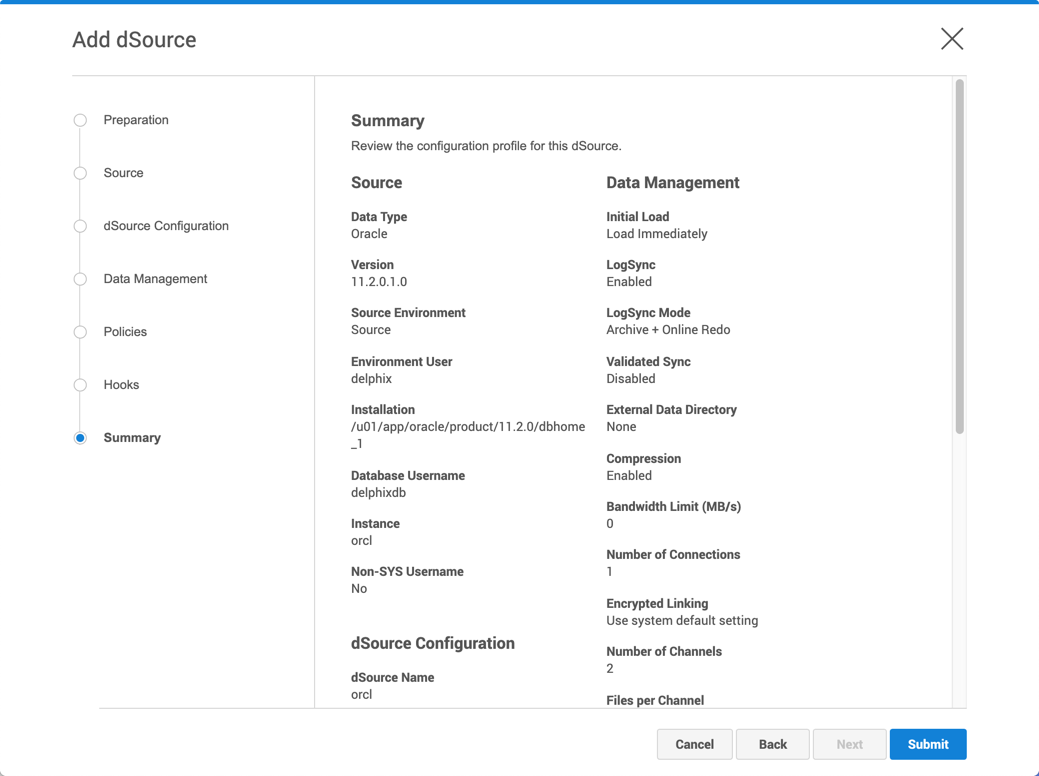
-
Review the Summary and click Submit.
-
Wait for the dSource to be created
You will know this is successful if the dSource completes in the Actions pane without Errors. Click on Actions in the top menu bar if you don't see this pane. Also, the dSource state will change to Active
</br>
Exercise 6 – Add Target Environments
In this exercise, you will:
- Connect Delphix to your Target Oracle server
Context
The target environment is the host where the virtual databases will be created.
Steps
- Log into the Delphix Data Platform UI as the admin user and the password that was set during the Engine setup (Note: If you forgot your admin password, please ask your lab administrator to reset it)
- In the top menu bar, click Manage and then Environments.
- Click the ellipses ( … ) next to Environments then choose Add Environment.
- Provide the following details in the Add Environment Wizard
- Host OS: Unix/Linux
- Server Type: Standalone
- Click Next
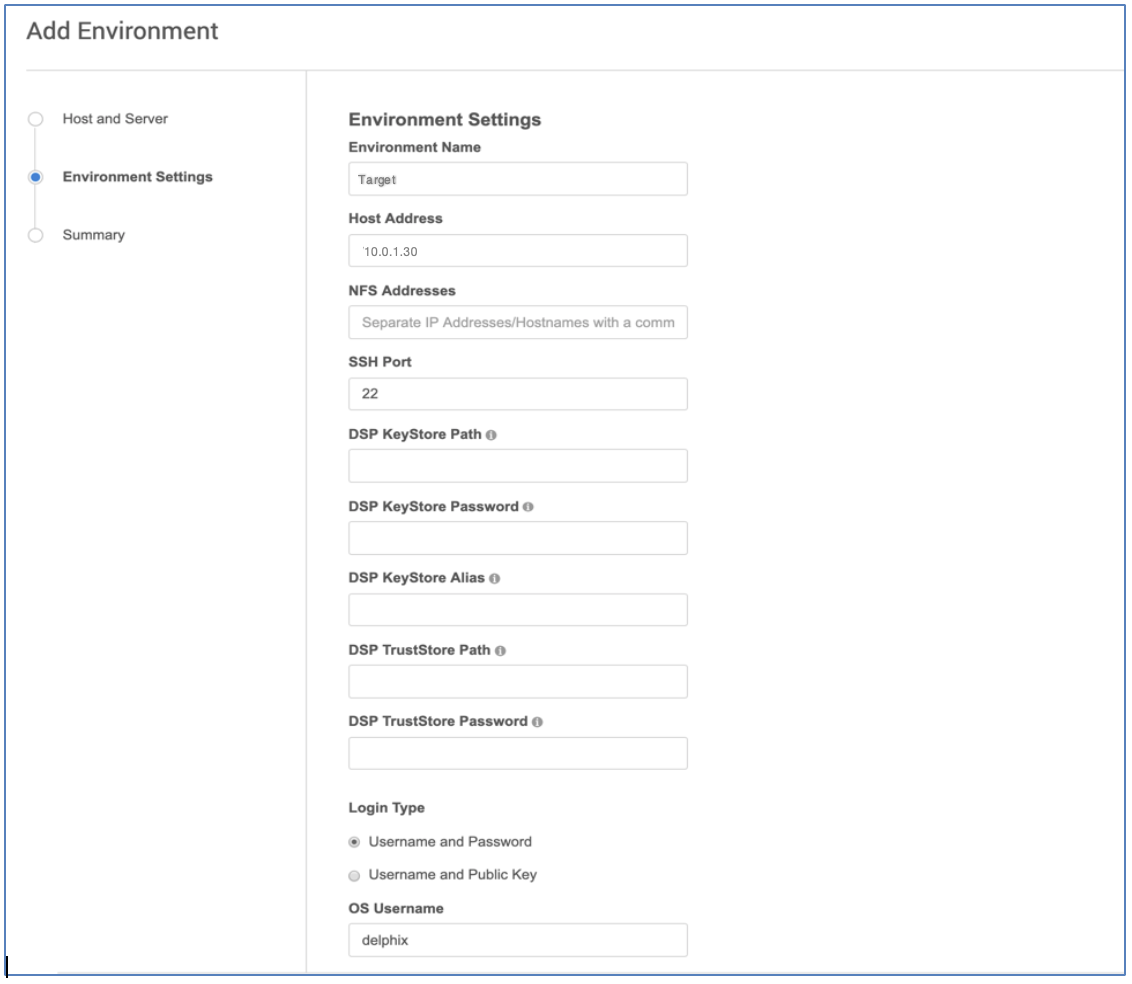
- On the Environment Settings tab, enter the following details
- Environment Name: Target
- Host Address: 10.0.x.30 ('x' will be your Student Number )
- NFS Addresses: 10.0.x.30 ('x' will be your Student Number )
- Leave the DSP fields blank
- OS Username: delphix
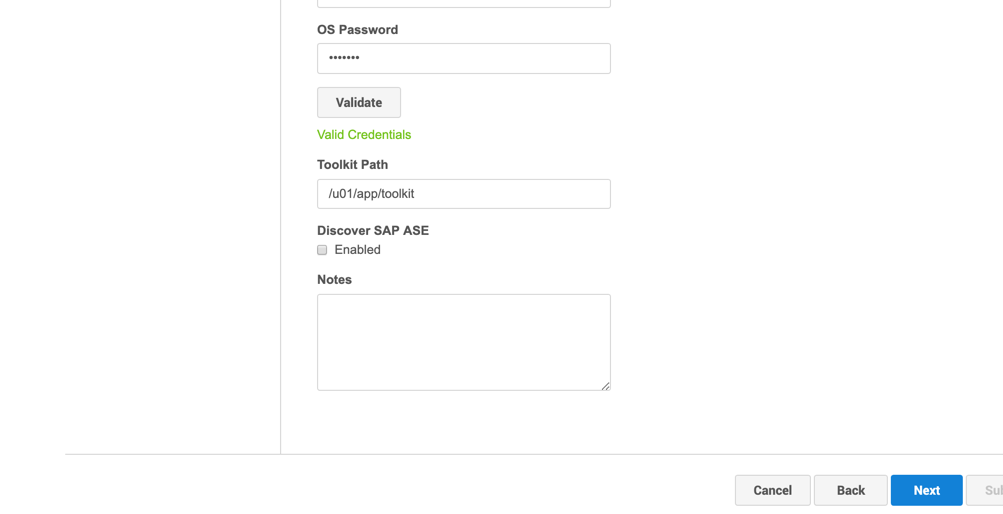
- OS Password: delphix
- Toolkit Path: /u01/app/toolkit (The Toolkit Path must be entered prior to clicking Validate)
- Click Validate
-
Click Next
- Click Submit
- You can view the status of the environment creation and discovery by clicking on the Actions menu on the top right-hand side of the page. Clicking on the job in the Actions pane will allow you to track its progress.
- View the Environment details
- Click on the Environment Name ( Target ) on the left and review information on the Details tab
- Click on the Databases tab to view any discovered database installations and databases
</br>
Exercise 7 – Provision a VDB
In this exercise, you will:
- Create a VDB called devdb
Context
The objective of Delphix virtualization is to provide easy access to virtualized databases that resemble production and other data systems. In Exercise 7, we provision a Virtual Database (VDB). VDBs are fully functional database images that can be created from dSources. Steps
- Click the Manage menu and then Datasets
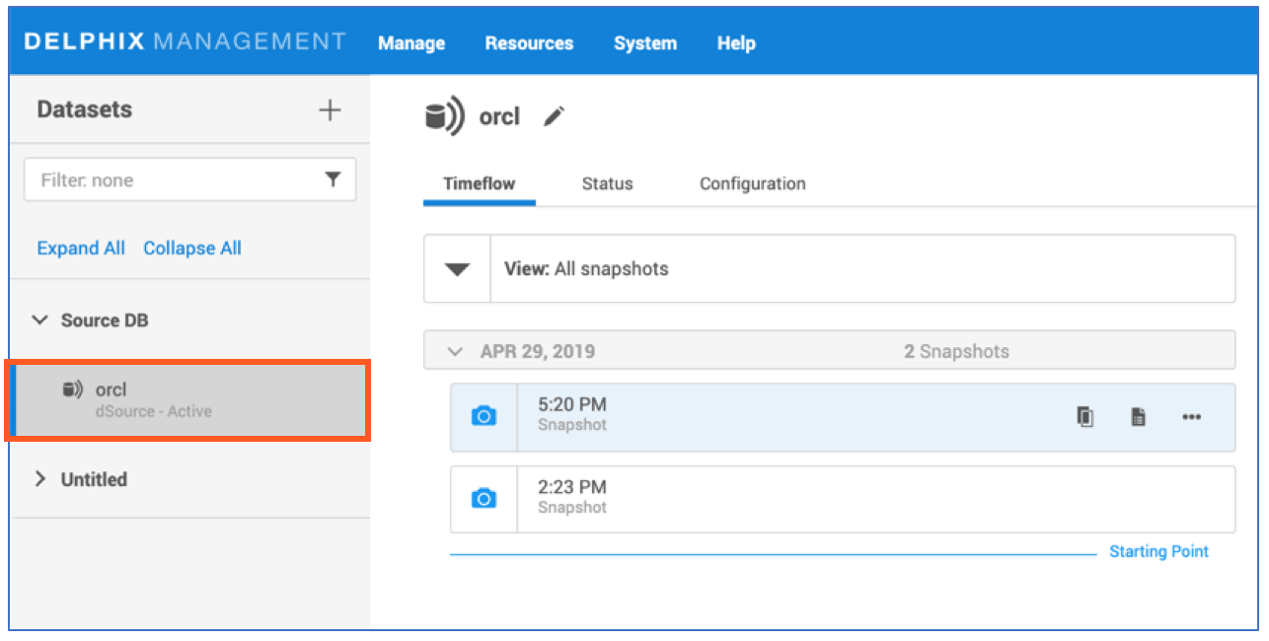
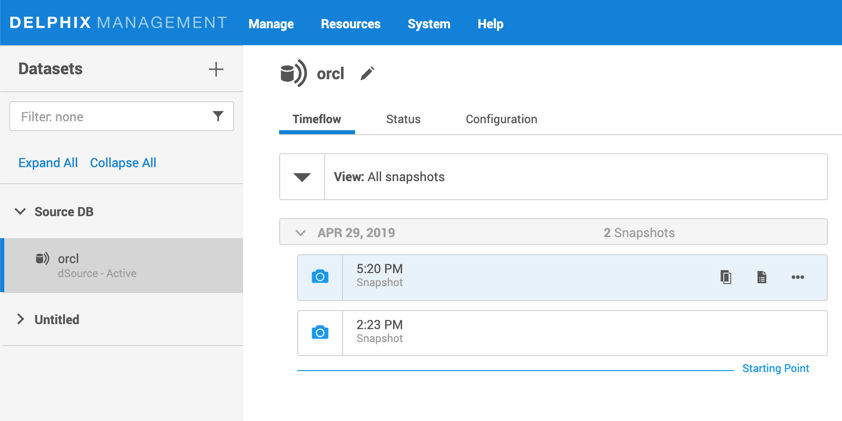
- Expand the Source DB group and click the orcl dSource from the Datasets panel on the left. This will reveal the Timeflow for the dSource by default.
- On the Timeflow tab of the dSource select the most recent (topmost) Snapshot. The Provision VDB iconwill appear along with the Open LogSync icon to the right.
-
Click on the Provision VDB icon (on the right of the Snapshot) to open the Provision VDB wizard. The first of the three icons next to the snapshot time.
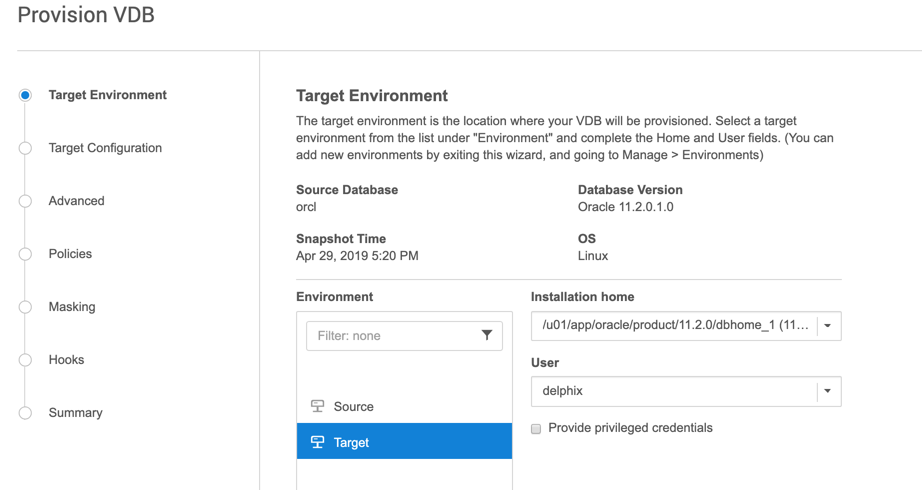
- On the Target Environment tab click Target from the list of Environments
- On the Target Environment tab, use the following information
- Verify that the Installation Home is set to /u01/app/oracle/product/11.2.0/dbhome_1 (11.2.0.1.0)
- Ensure that the Environment User is set to delphix
-
Click Next
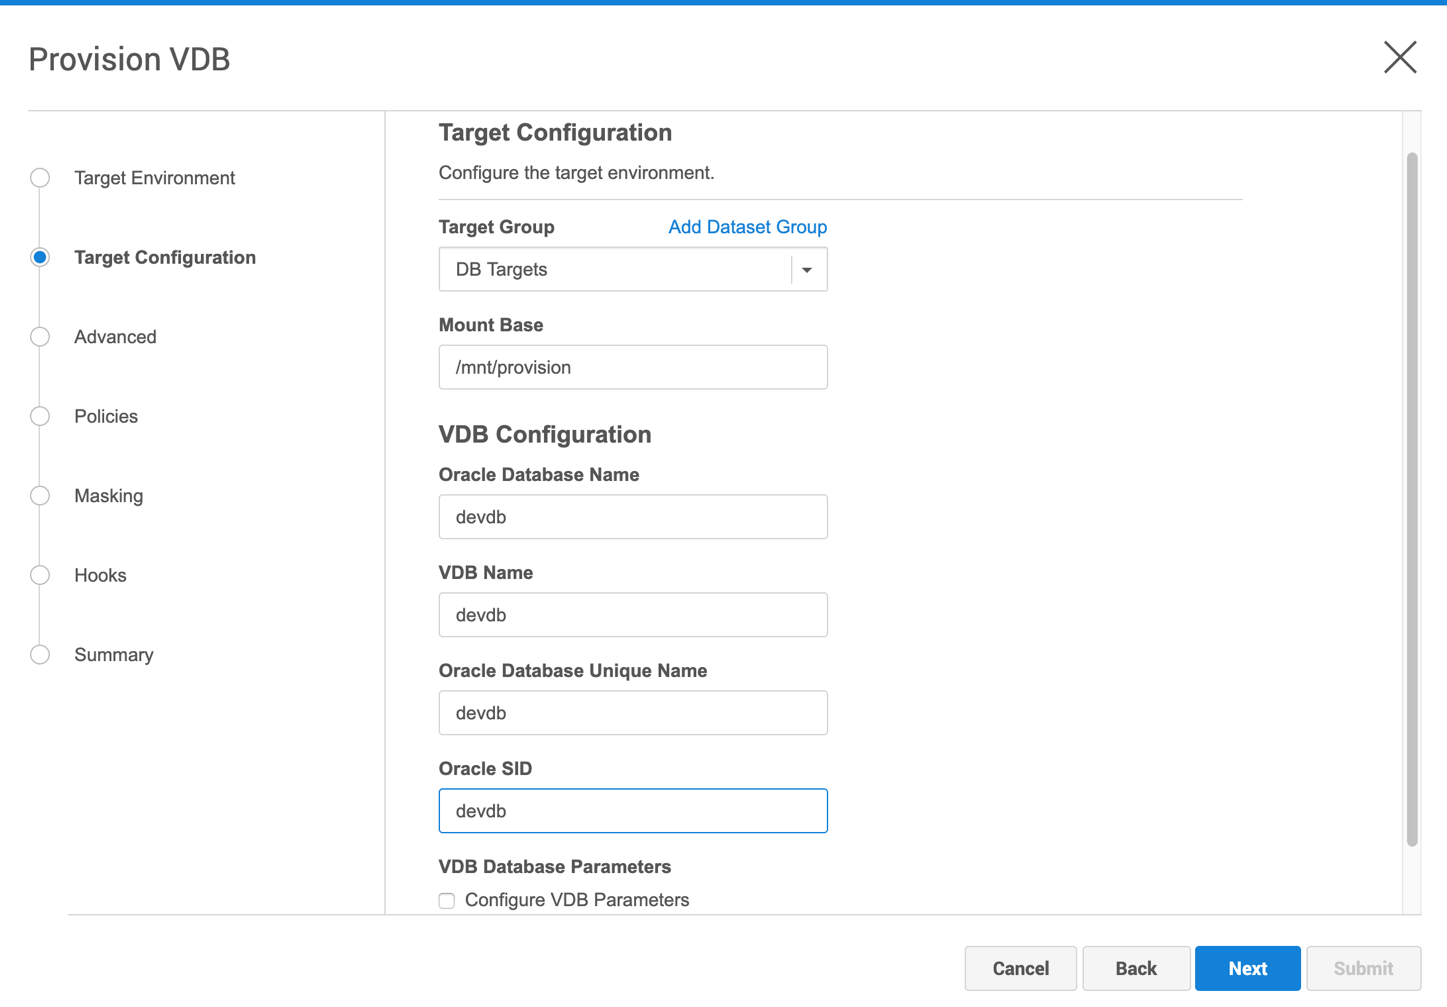
- Enter the details below on the Target Configuration tab , we will provide a user-friendly name for the VDB as well as assign it to a new group.
- Click Add Dataset Group
- Type DB Targets for the Group Name
- Click Add
- Verify that DB Targets is selected as the Target Group
- Mount Base : Type /mnt/provision
- Oracle Database Name : Type devdb
- VDB Name : Type devdb
- Oracle Database Unique Name : Type devdb
- Oracle SID : devdb
-
Click Next
- Click Add Dataset Group
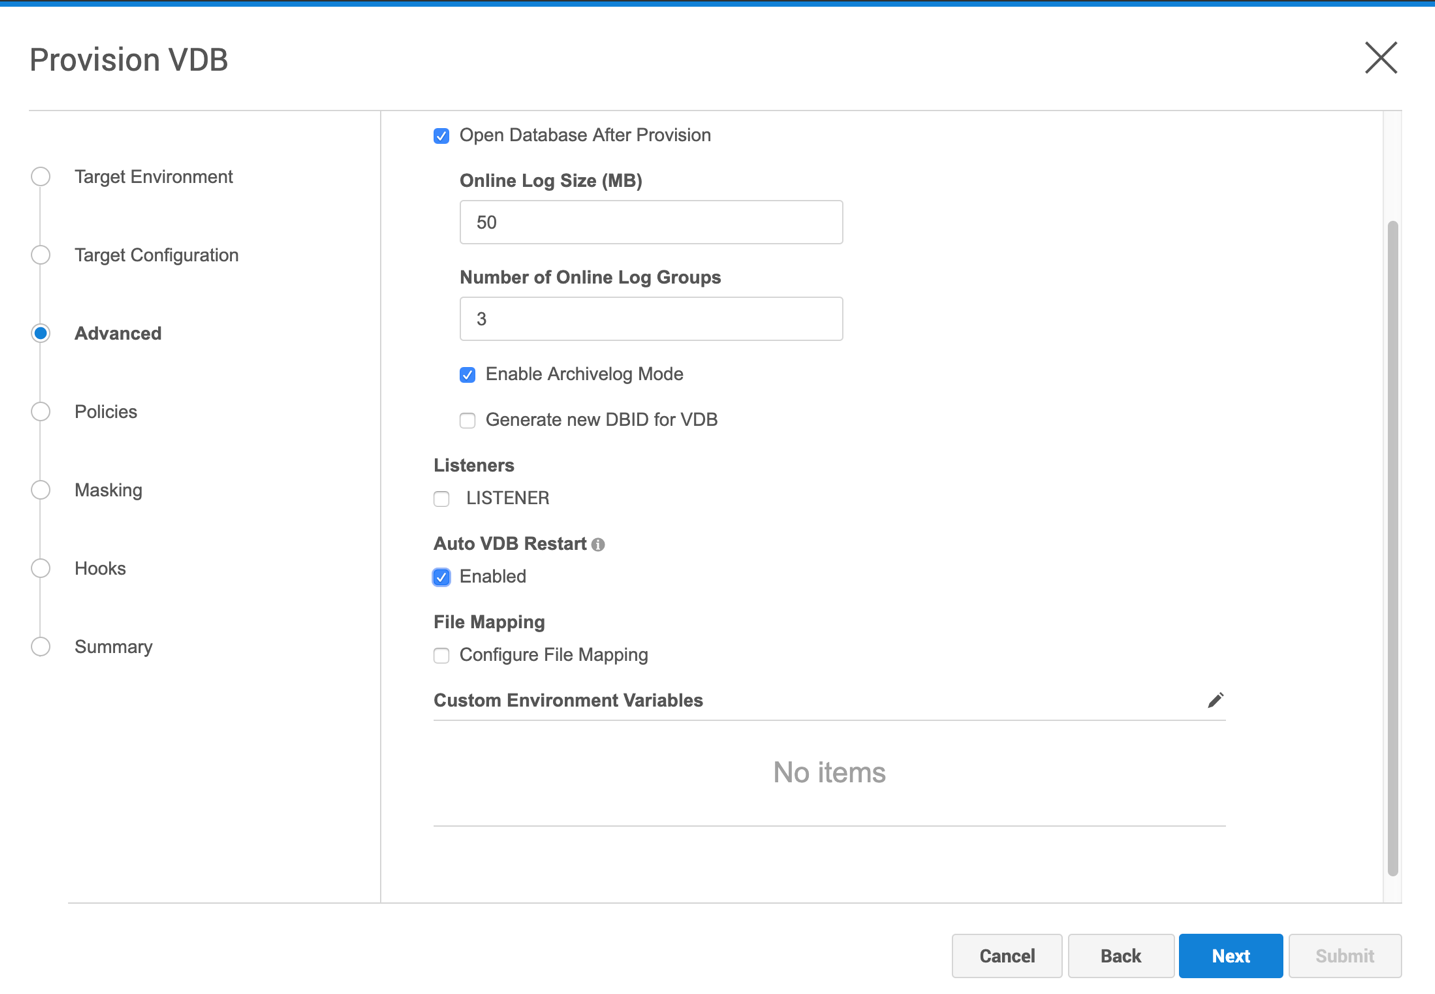
- On the Advanced tab
- Confirm that Open Database After Provision is selected
- Confirm that Enable Archivelog Mode is selected
- Check the box next to Enabled for Auto VDB Restart
-
Click Next
- On the Policies tab, accept the defaults and click Next
- On the Masking tab, confirm that Mask this VDB is not checked
- Accept the defaults on the Hooks tab and click Next
- Verify the summary information
-
Click Submit tocomplete the VDB creation
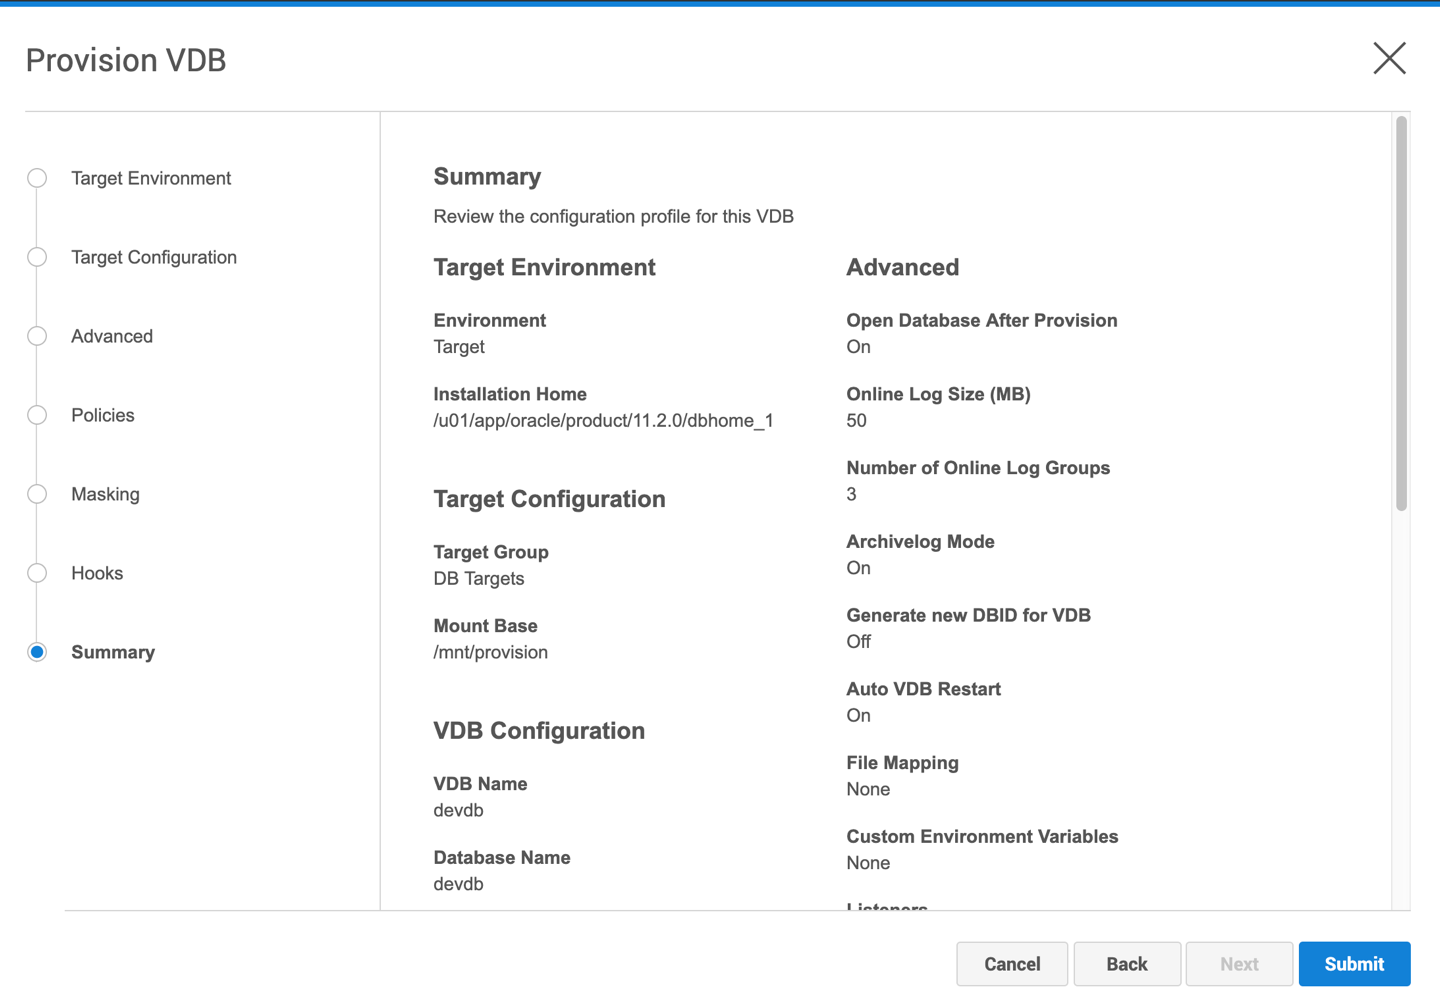
It may take a couple minutes for the VDB creation to complete. You can monitor the status on the left-hand side of the screen next to the devdb object in the DB Targets group. On the Actions pane on the right-hand side of the screen, you should see the Provision virtual database "devdb" item move to the Recently completed pane without error. devdb's status will be set to VDB - Running.
Once the VDB is created, you can verify that the VDB is operational by:
- Using Terminal on your lab server, use SSH to connect to your Linux Target server
- Type ssh 10.0.x.30 ('x' will be your Student Number ).
- Enter the username: delphix
- Enter the password: delphix
- Run the following commands on the target server command line:
- Type export ORACLE_HOME=/u01/app/oracle/product/11.2.0/dbhome_1
- Type export ORACLE_SID=devdb
- Type export PATH=$ORACLE_HOME/bin:$PATH
- Type sqlplus / as sysdba
-
Type select name from v$database;

- Type quit to exit
</br>
Exercise 8 – Refresh a VDB
In this exercise, you will:
- Create a new table on your source database
- Snapshot the dSource
- Refresh your VDB - devdb
- Verify the new table appears on the VDB
Context
VDBs can get out of sync as new data comes into the source system. Refreshing a VDB will re-provision it from the dSource. Refreshing a VDB will delete any changes that have been made to it over time.
Steps
- Open Terminal on your Lab Server desktop
- Type ssh delphix@10.0.x.20 ('x' will be your Student Number )
- Enter the username: delphix
- Enter the password: delphix
- Run the following commands:
- Type export ORACLE_HOME=/u01/app/oracle/product/11.2.0/dbhome_1
- Type export ORACLE_SID=orcl
- Type export PATH=$ORACLE_HOME/bin:$PATH
- Type sqlplus / as sysdba
- Type create table sourcetab as select * from dba_objects;
- Go back to the Delphix Data Platform in your browser (click the Delphix logo to go back to the main screen if required)
- Click on the orcl dSource object on the left side of your screen (expand DB Source group if needed)
- Click the Camera Icon on the top-right to take a snapshot
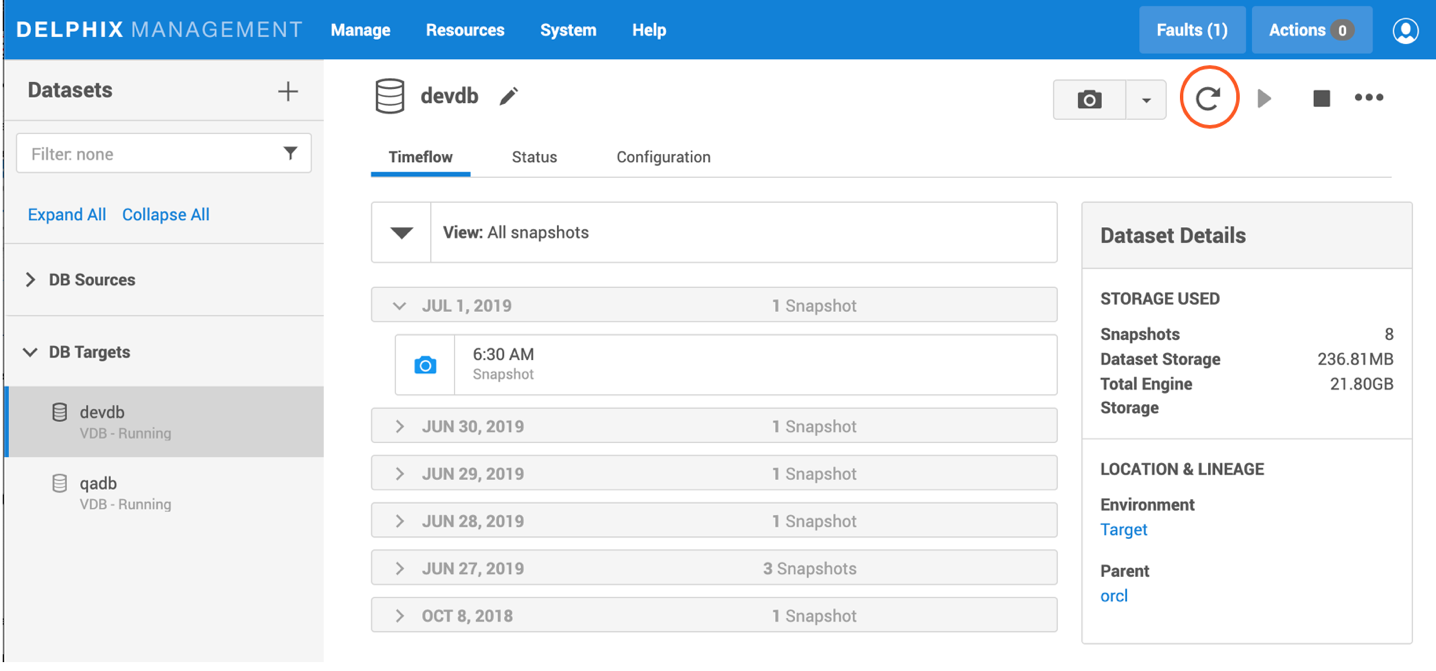
- Click on the devdb VDB on the left side of your screen
- Click the Timeflow tab
-
Click the Refresh button on the top right next to the snapshot icon.
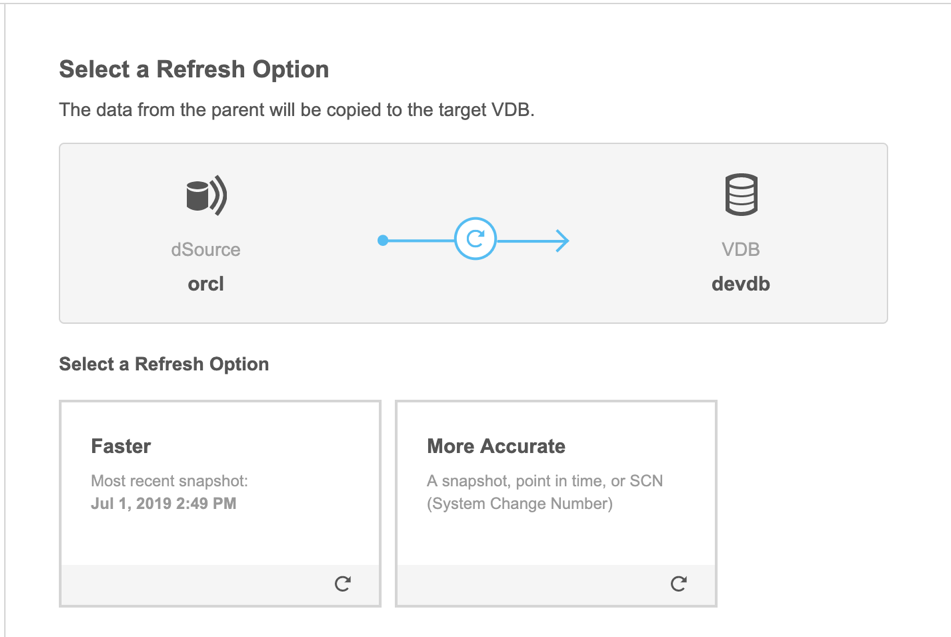
- There are two options for refreshing the VDB, choose the Faster option to refresh from the most recent snapshot from the orcl dSource
- Click Next
-
Click Submit
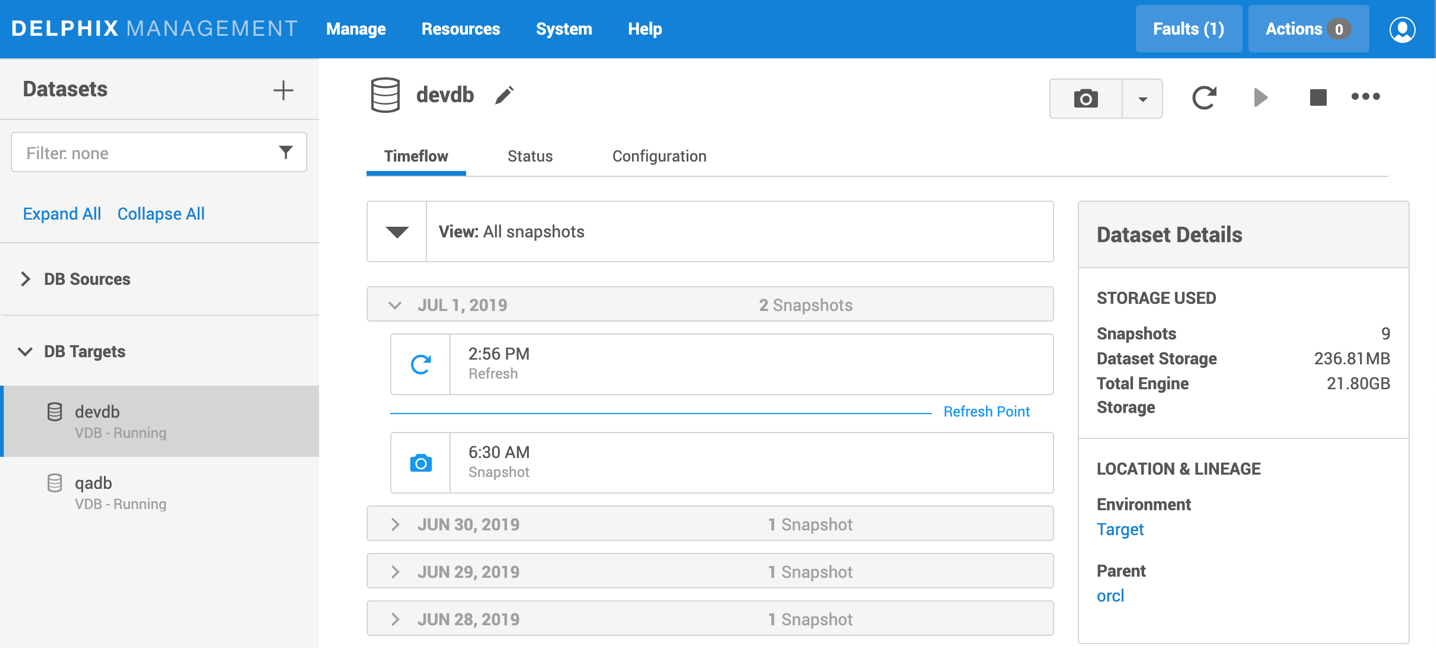
- Once the refresh has completed, a new VDB snapshot will be generated and reflected in the Timeflow.
- Log into devdb to confirm.
- Open Terminal on your Lab Server desktop
- Type ssh delphix@10.0.x.30 ('x' will be your Student Number )
- Enter the username: delphix
- Enter the password: delphix
-
Run the following commands:
- Type export ORACLE_HOME=/u01/app/oracle/product/11.2.0/dbhome_1
- Type export ORACLE_SID=devdb
- Type export PATH=$ORACLE_HOME/bin:$PATH
- Type sqlplus / as sysdba
-
Type select count(*) from sourcetab;
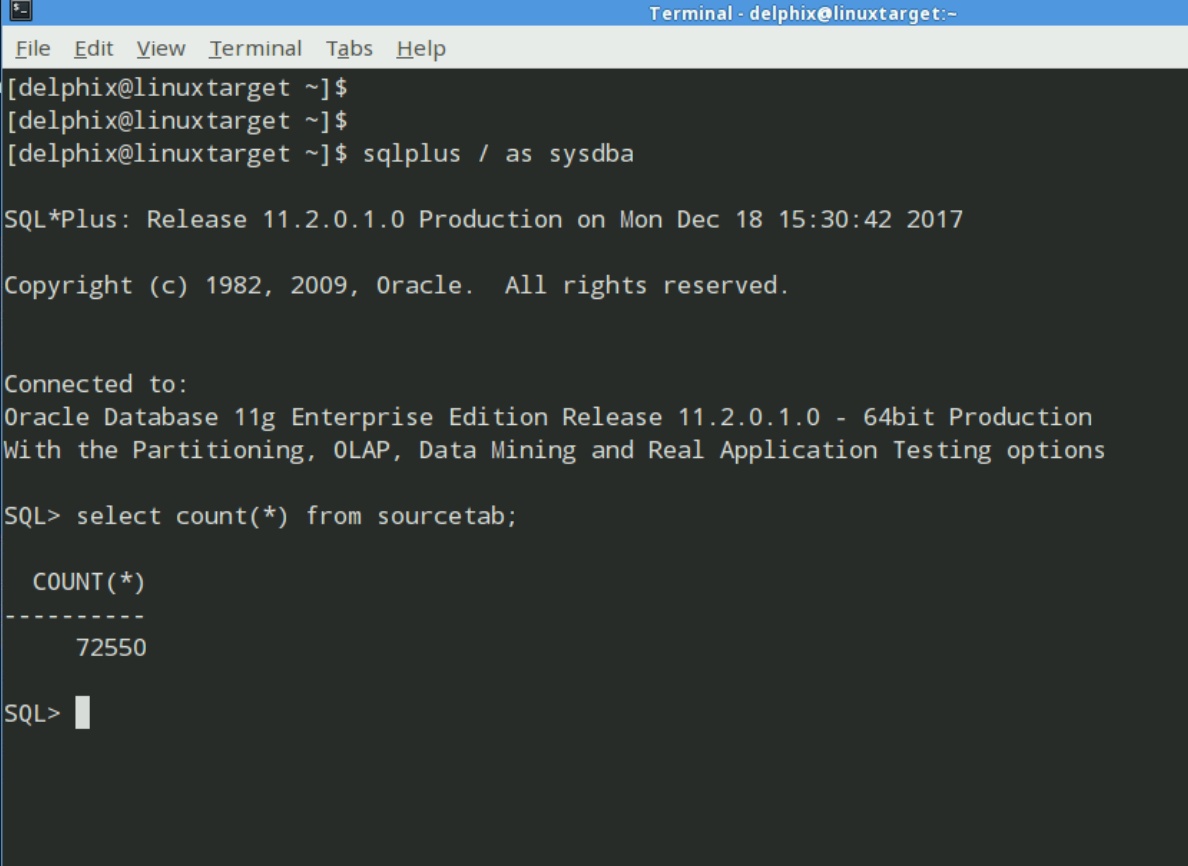
If this returns a count of rows, the snapshot/refresh was successful.
</br>
Exercise 9 – Rewind a VDB
In this exercise, you will:
- Take a snapshot of the devdb VDB
- Corrupt the devdb VDB to introduce a bootstrap error
- Rewind the devdb VDB to recover from the error
Context
Rewinding a VDB rolls it back to a previous point in its Timeflow and re-provisions the VDB. The VDB will no longer contain changes after the rewind point. it can be triggered when changes to the VDB do not need to be saved.
Steps
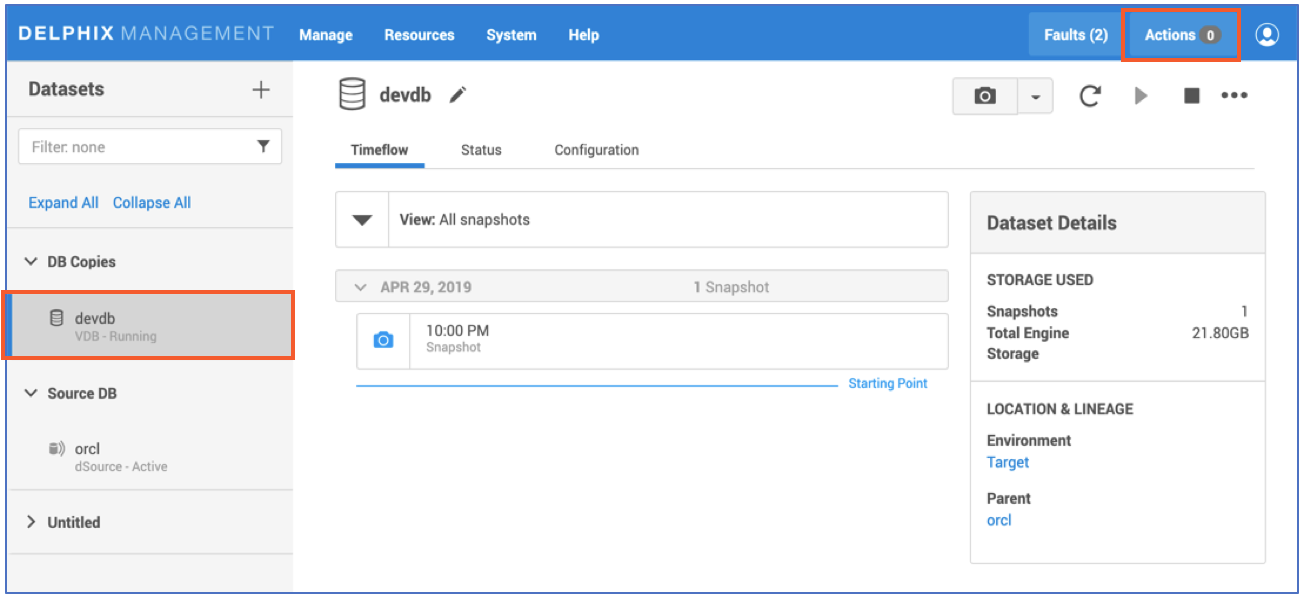
- On the Delphix main screen, select the devdb VDB
-
Click the Camera icon on the top right to take a snapshot of the VDB

- A new snapshot card will be created on the devdb Timeflow. Make a note of the date/time for the latest snapshot card.
- Open Terminal on your Lab Server desktop
- Type: ssh delphix@10.0.x.30 ('x' will be your Student Number )
- Enter the username: delphix
- Enter the password: delphix
- Run the following commands:
- Type export ORACLE_SID=devdb
- Type sqlplus / as sysdba
- Type delete from sys.obj$;
- Type commit;
- Type shutdown abort;
-
Type startup;
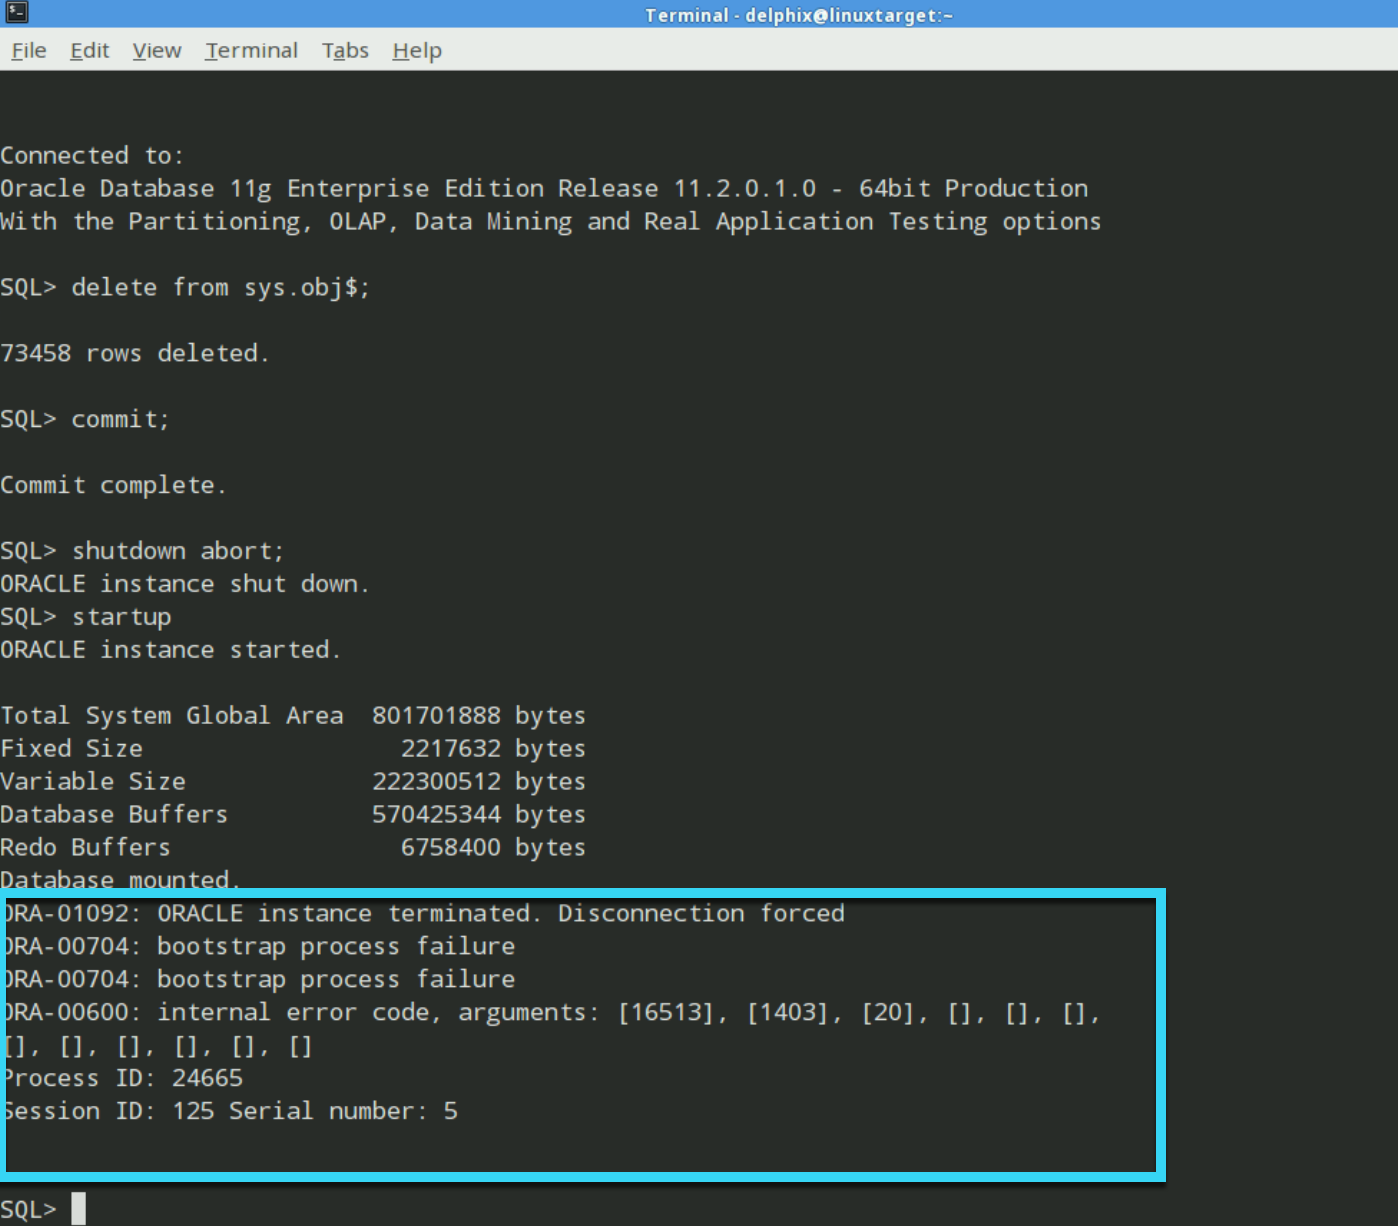
- Note that the database is unable to come online due to a bootstrap error. The devdb database is now corrupted. Now we will rewind the VDB to the last good snapshot to fix this.
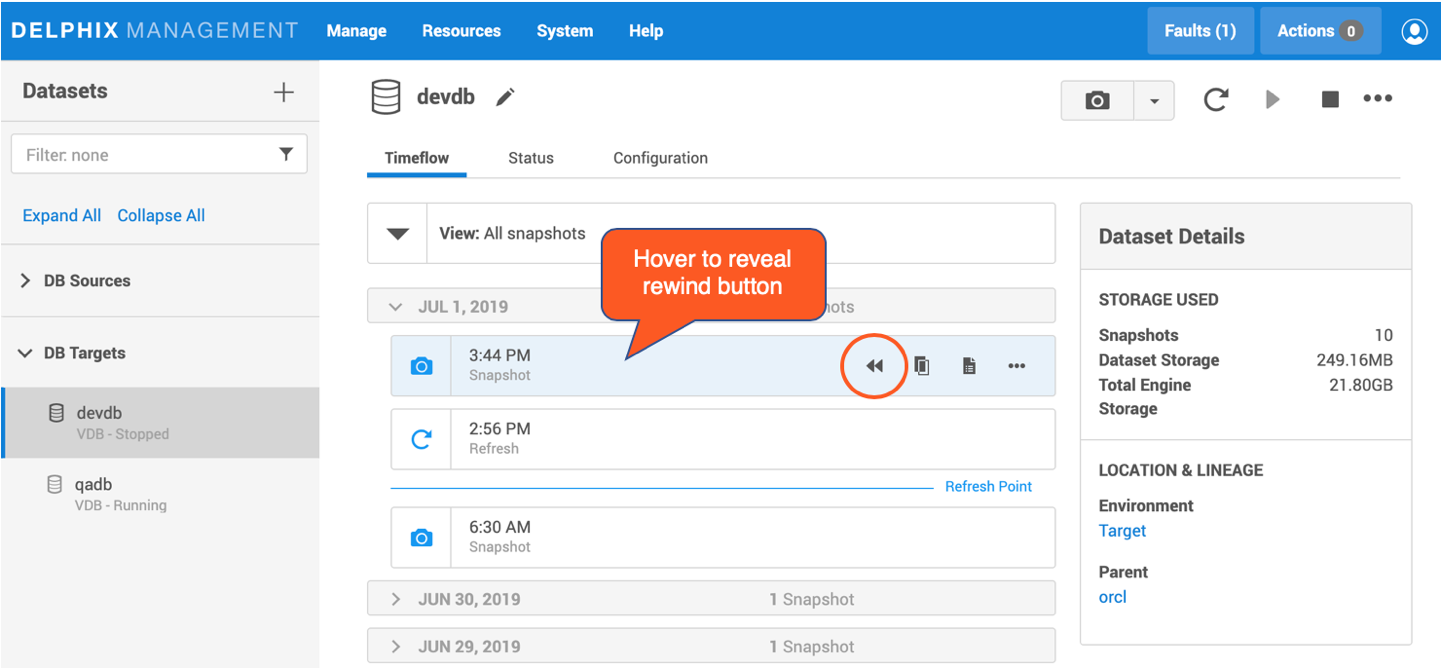
- In the Delphix Data Platform (web browser), click on the devdb VDB if it is not already selected
- Click on the Timeflow tab and select the snapshot associated with the date/time you recorded prior to corrupting your database. This will most likely be the latest snapshot.
- Hover over the Snapshot to reveal the Rewind button.
-
Click the Rewind VDB button on the Timeflow
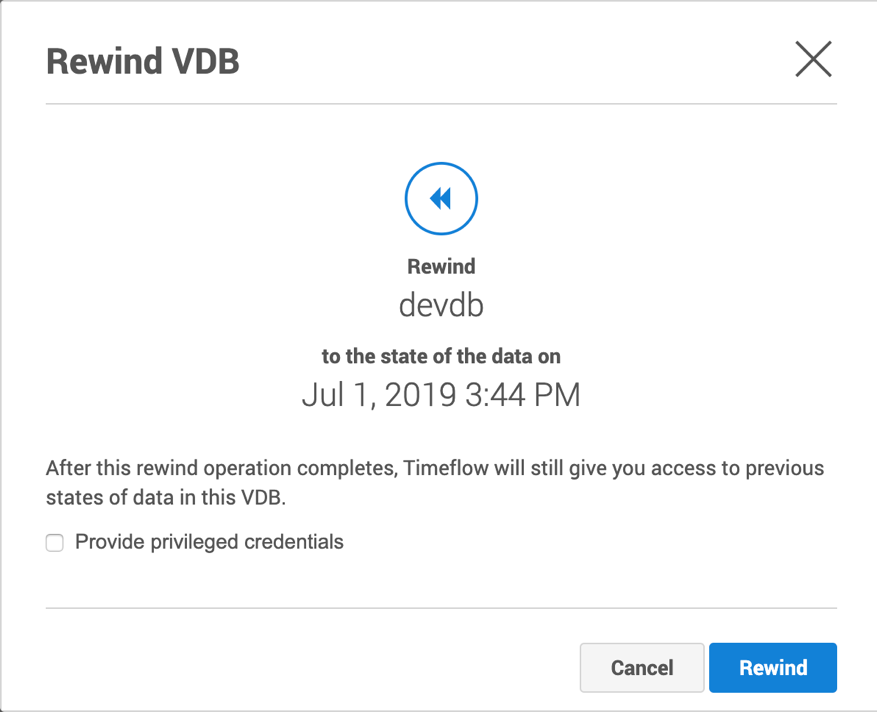
-
Confirm that you wish to rewind the VDB by clicking Rewind.
Once the rewind operation is complete, you can confirm the rewind was successful by connecting to the server again and querying the database:
- Open Terminal on your Lab Server desktop
- Type ssh delphix@10.0.x.30 ('x' will be your Student Number )
- Enter the username: delphix
- Enter the password: delphix
- Run the following commands:
- Type export ORACLE_HOME=/u01/app/oracle/product/11.2.0/dbhome_1
- Type export ORACLE_SID=devdb
- Type export PATH=$ORACLE_HOME/bin:$PATH
- Type sqlplus / as sysdba
-
Type select count(*) from sourcetab;

</br>
Exercise 10 – Set a New Retention Policy
There are four types of Policies in Delphix. In this exercise, you will:
- Create a Retention Policy
- Set the new policy to keep snapshots and logs for 30 days, along with 3 monthly snapshots
- Apply the policy to the VDB we created in the previous exercise
Context
Both dSources and VDBs timeflow is governed by snapshots, which are either created manually or through policies. Retention policies govern the lifespan of such snapshots and help clean older ones that are no longer relevant.
Steps
- In the top menu bar, click on Manage and then Policies
-
Click the Retention tab, click +Retention

- Provide the following details:
- Policy Name: Long Term
- Keep Logs for: 30** **days
- Keep Snapshots for: 30** **days
-
Click the Show advanced link
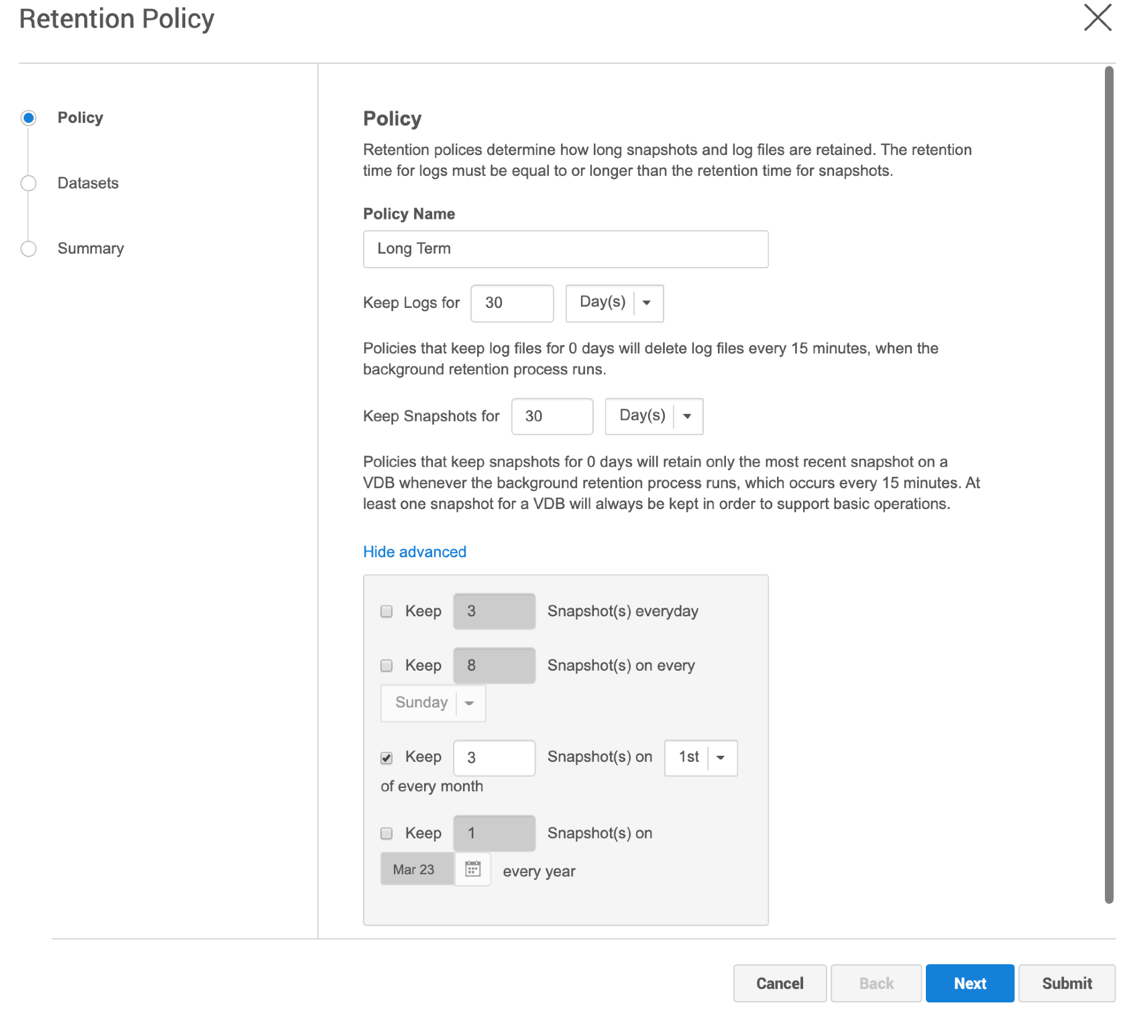
- Click the checkbox next to Keep 3 Snapshot(s) on 1st of every month
- Click Next
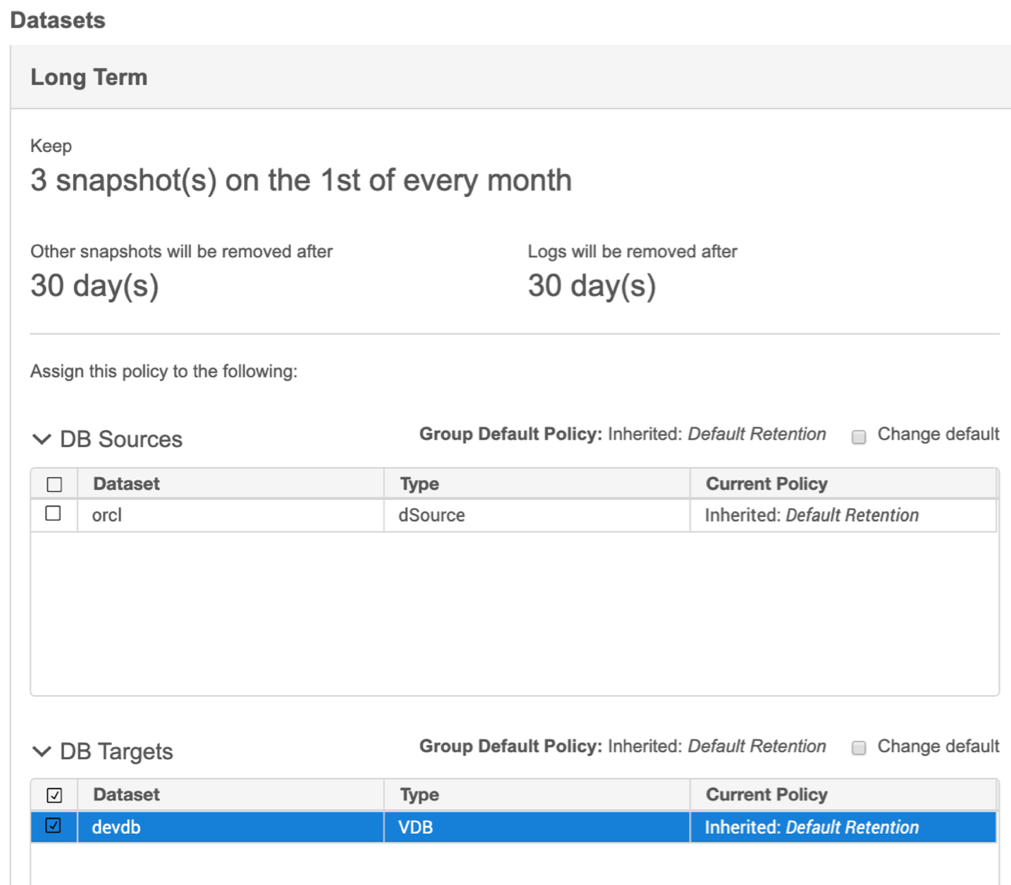
- On the Datasets tab click the checkbox for the devdb
-
Click Submit
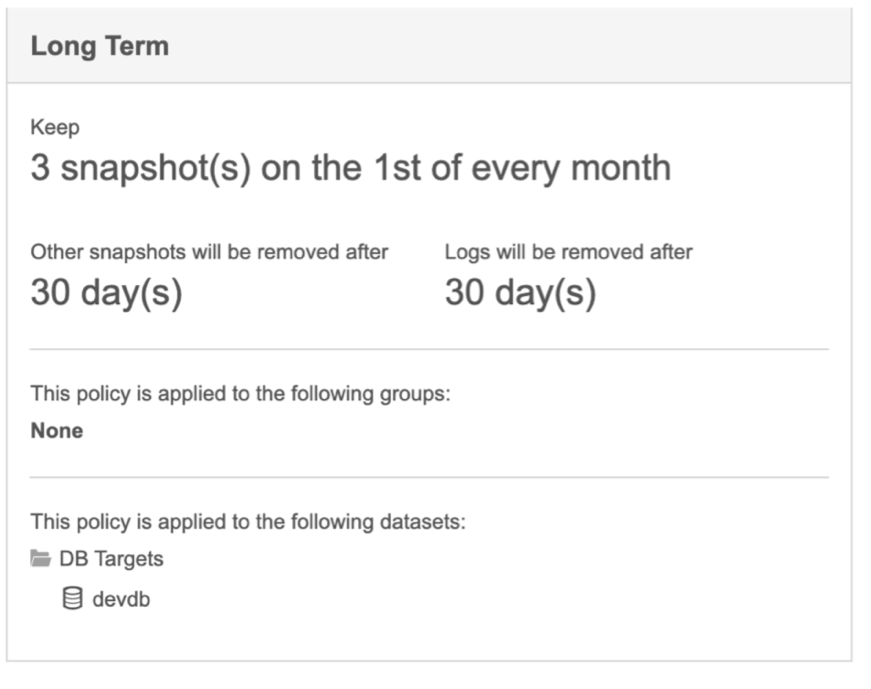
Expand the policies menu to validate that the new Long Term policy has been applied to the devdb VDB.
</br>
Exercise 11 – Create and Save a Hook Operation Template
In this exercise, you will:
- Create a Hook Template called Create APPUSER
- Insert code into the template that will log into a database and add a user named appuser
Context
Hook operations allow users to execute custom operations at select points during linking sources and managing virtual datasets.
Steps
- In the top menu bar, click Manage , then Hook Templates
- Click the plus sign to the right of the word Templates in the Hook Templates Wizard
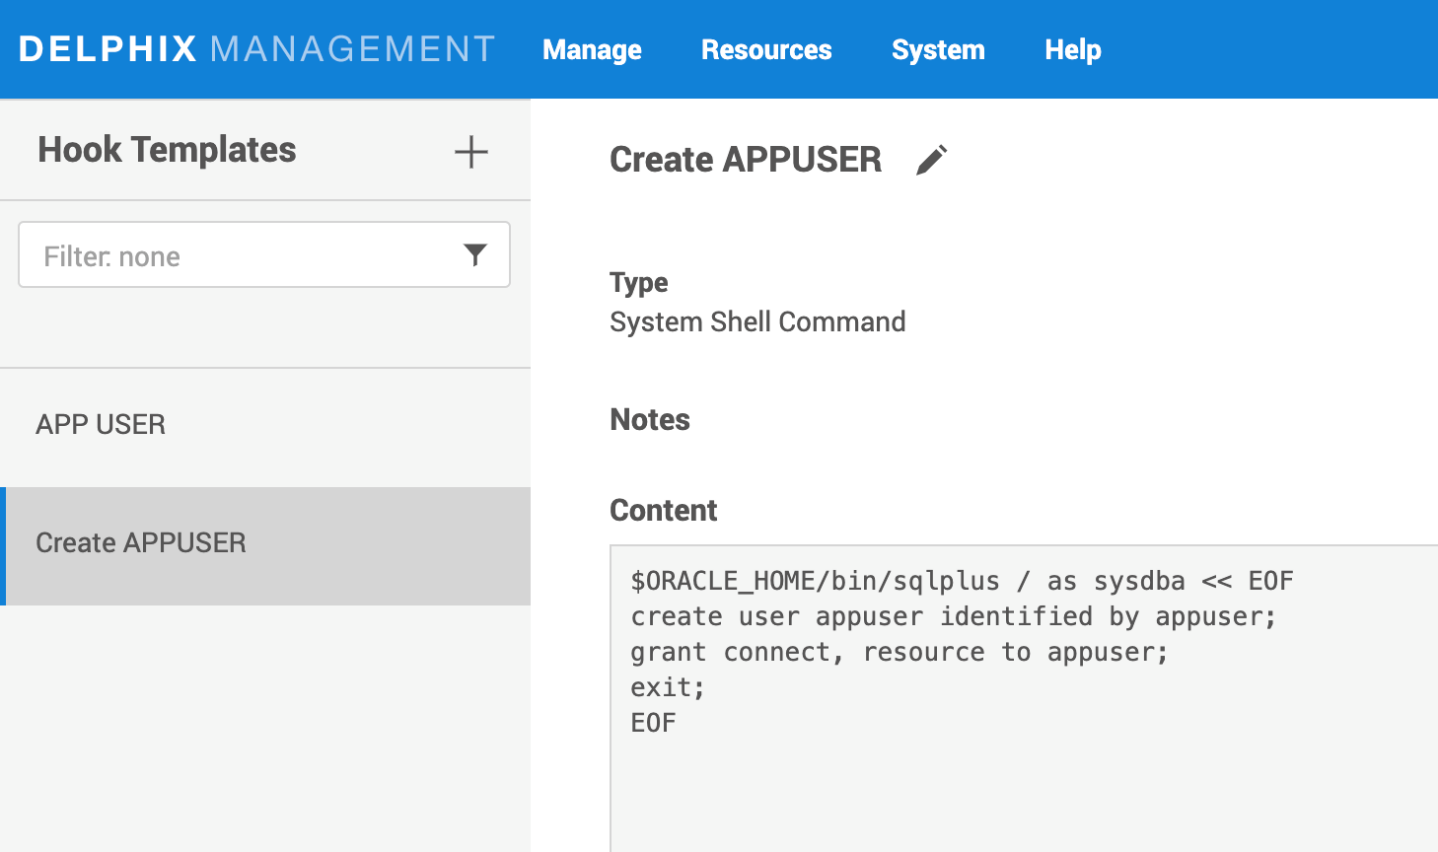
- Provide the Name: Create APPUSER
- Ensure Type is set to: System Shell Command
- Under Contents , enter the following code:
$ORACLE_HOME/bin/sqlplus / as sysdba << EOF
  create user appuser identified by appuser;
  grant connect, resource to appuser;
  exit;
EOF
IMPORTANT: Make sure the carriage returns you see here are the same in the pasted contents.
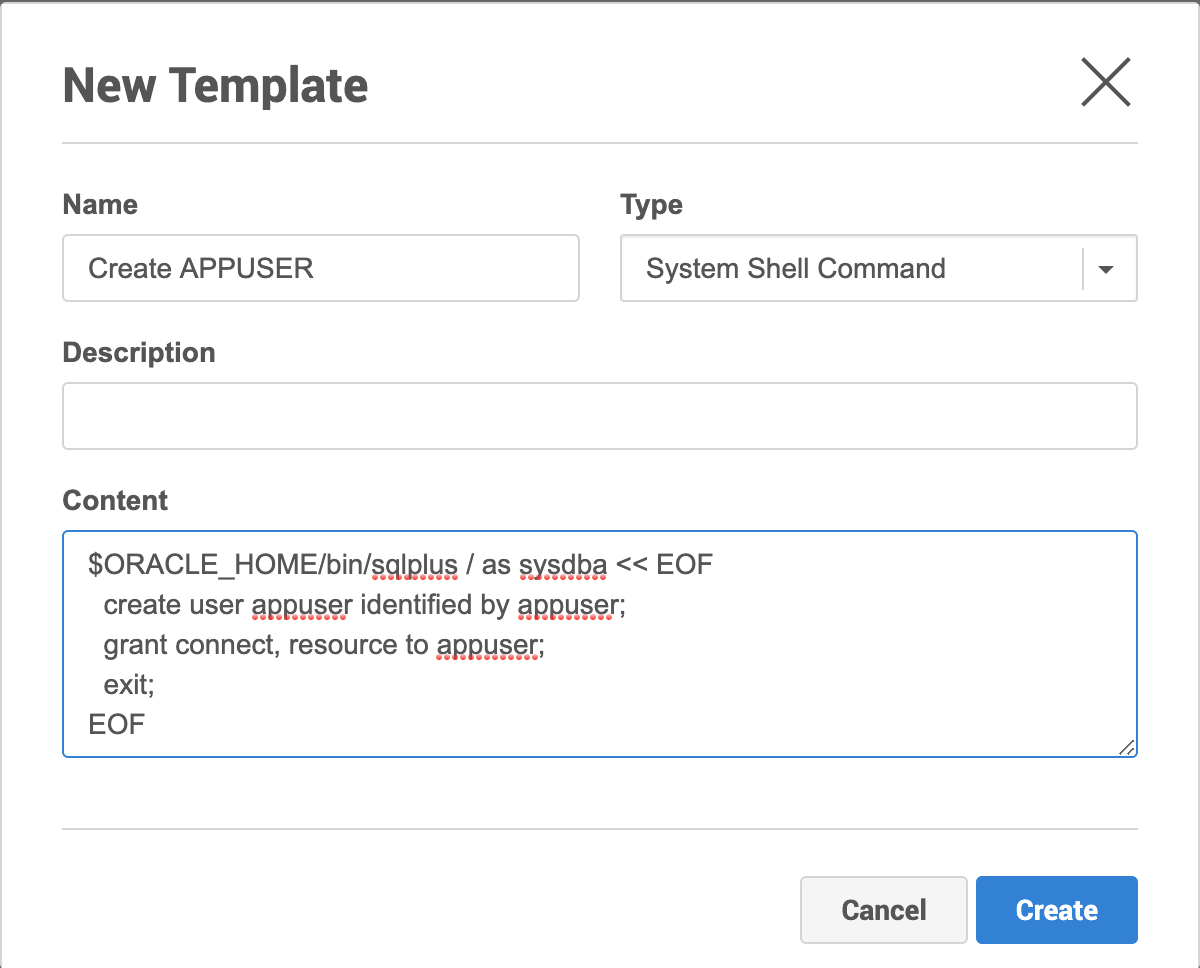
- Click Create
-
Verify the Create APPUSER Hook Operation Template is in the list, then click Close
</br>
Exercise 12 – Create a VDB Template
In this exercise, you will:
- Create a VDB Configuration template called Small DB Template
- Set a custom Oracle parameter for this template
Steps
- In the top menu bar, click Manage , then VDB Config Templates
- Click the plus sign next to the word VDB Config Templates and select New Template from the drop-down.
- Name: 1G Template
-
Click Create

- Click 1G Template under VDB Config Templates
- Click the pencil icon on the top right of the VDB Configuration Templates screen
- Click the plus sign on the top right to add a new parameter
- Double-click the row to enter a new value
- In the row that is now highlighted, enter the following information:
- Name: sga_max_size
- Value: 1G
- Click the checkmark to save the Template.
You can verify that this was successful by returning to the VDB Configuration Templates Wizard and clicking on the 1G Template item.
</br>
Exercise 13 – Provision a VDB with Hook and VDB Template
In this exercise, you will:
- Create a VDB called qadb onTarget
- Use the VDB Configuration Template we created previously
- Use the Hook Operation Template we created previously
- Log into the VDB
- Verify the VDB Configuration Template and Hook Operation Template were successful
Steps
- Return to the Delphix home screen by clicking the Delphix logo on the top left of the screen
- Click on the orcl dSource object in the Datasets panel
- Select the latest Snapshot , click the Provision button
- On the left hand side of the Target Environment tab, click the Target Environment Target
- Click Next
- On the Target Configuration tab, enter the following details:
- Select DB Targets from the Datasets Group drop-down list,
- Mount Base : /mnt/provision (this should already be filled in)
- Database Name : qadb
- Database Unique Name : qadb
- SID : qadb
- Click Configure VDB Parameters checkbox under VDB Database Parameters
- Click Next
- On the Advanced tab, click the Enabled checkbox under Auto VDB Restart
- Click Next
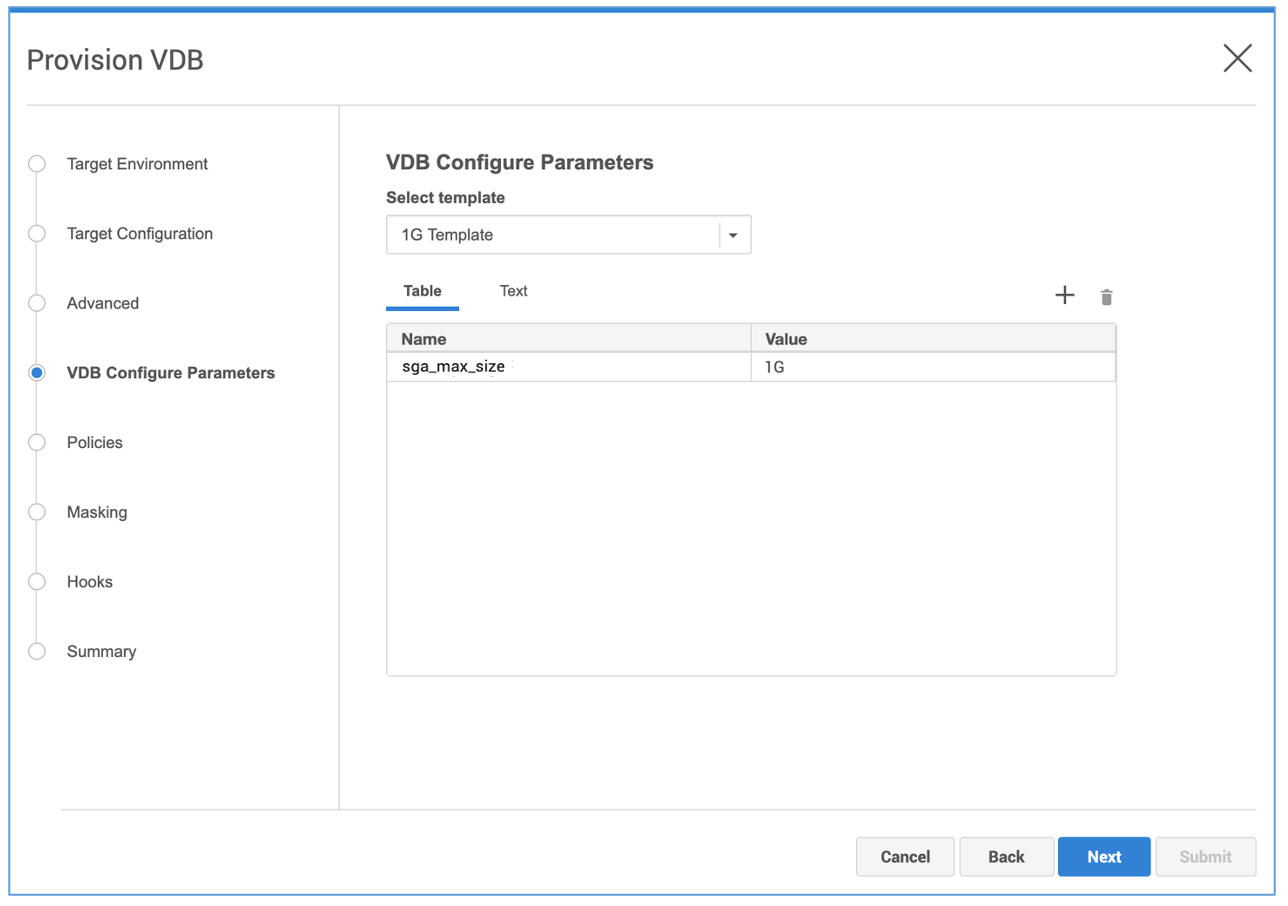
- On the VDB Configure Parameters tab, click the 1G Template that we created earlier from the Select template drop-down list
-
Click Next
- On the Policies tab, accept Default Snapshot Policy and Click Next
- On the Masking tab, leave Mask this VDB unchecked. Click Next
-
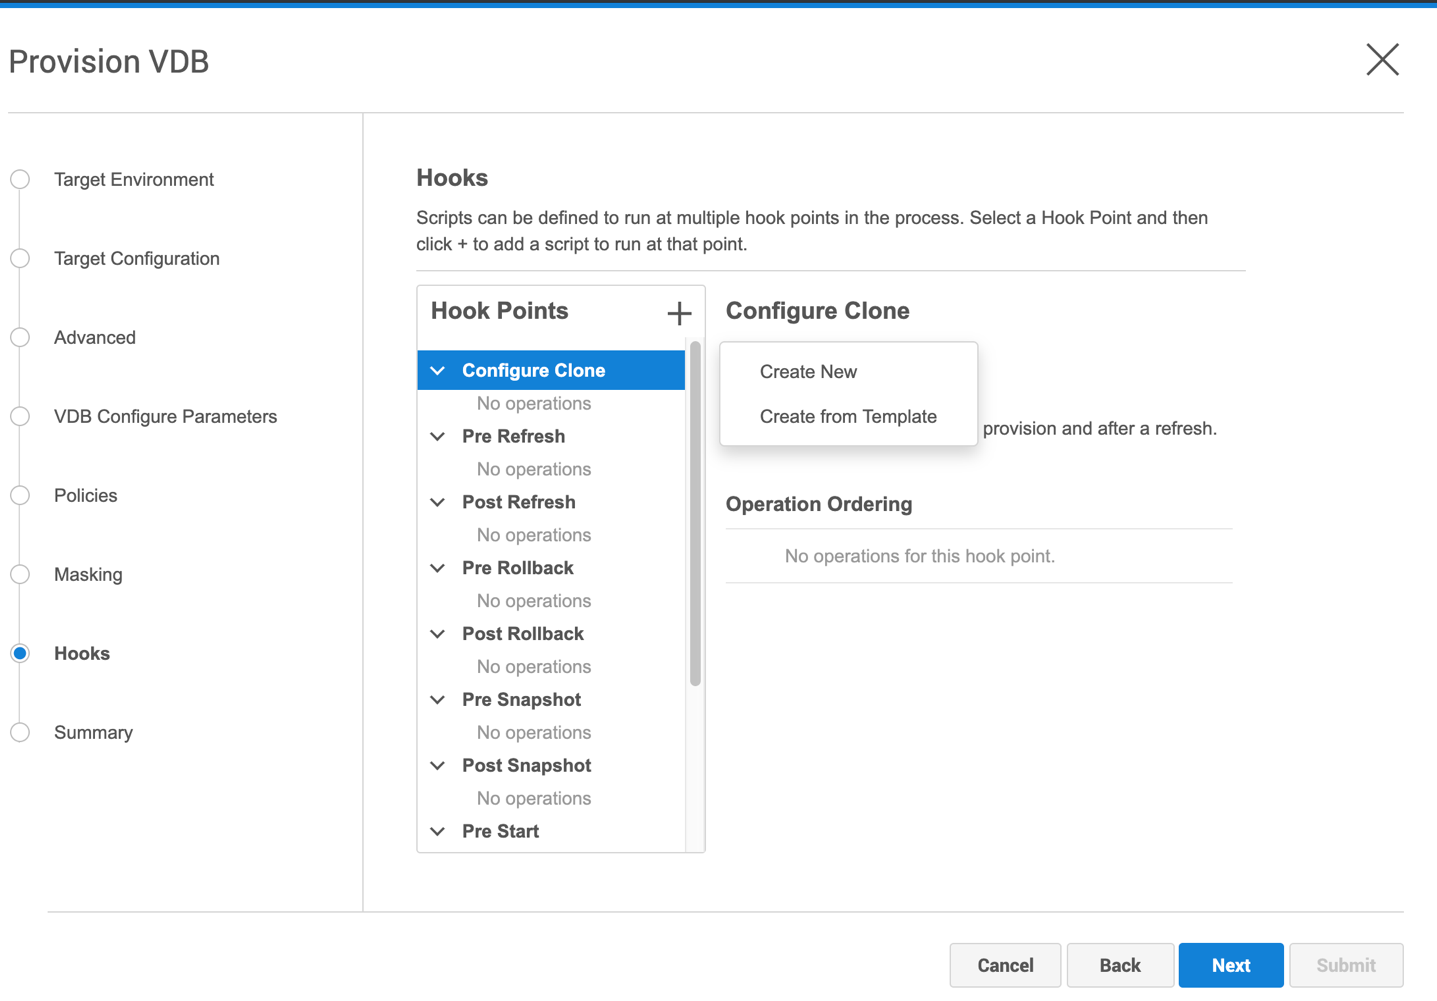
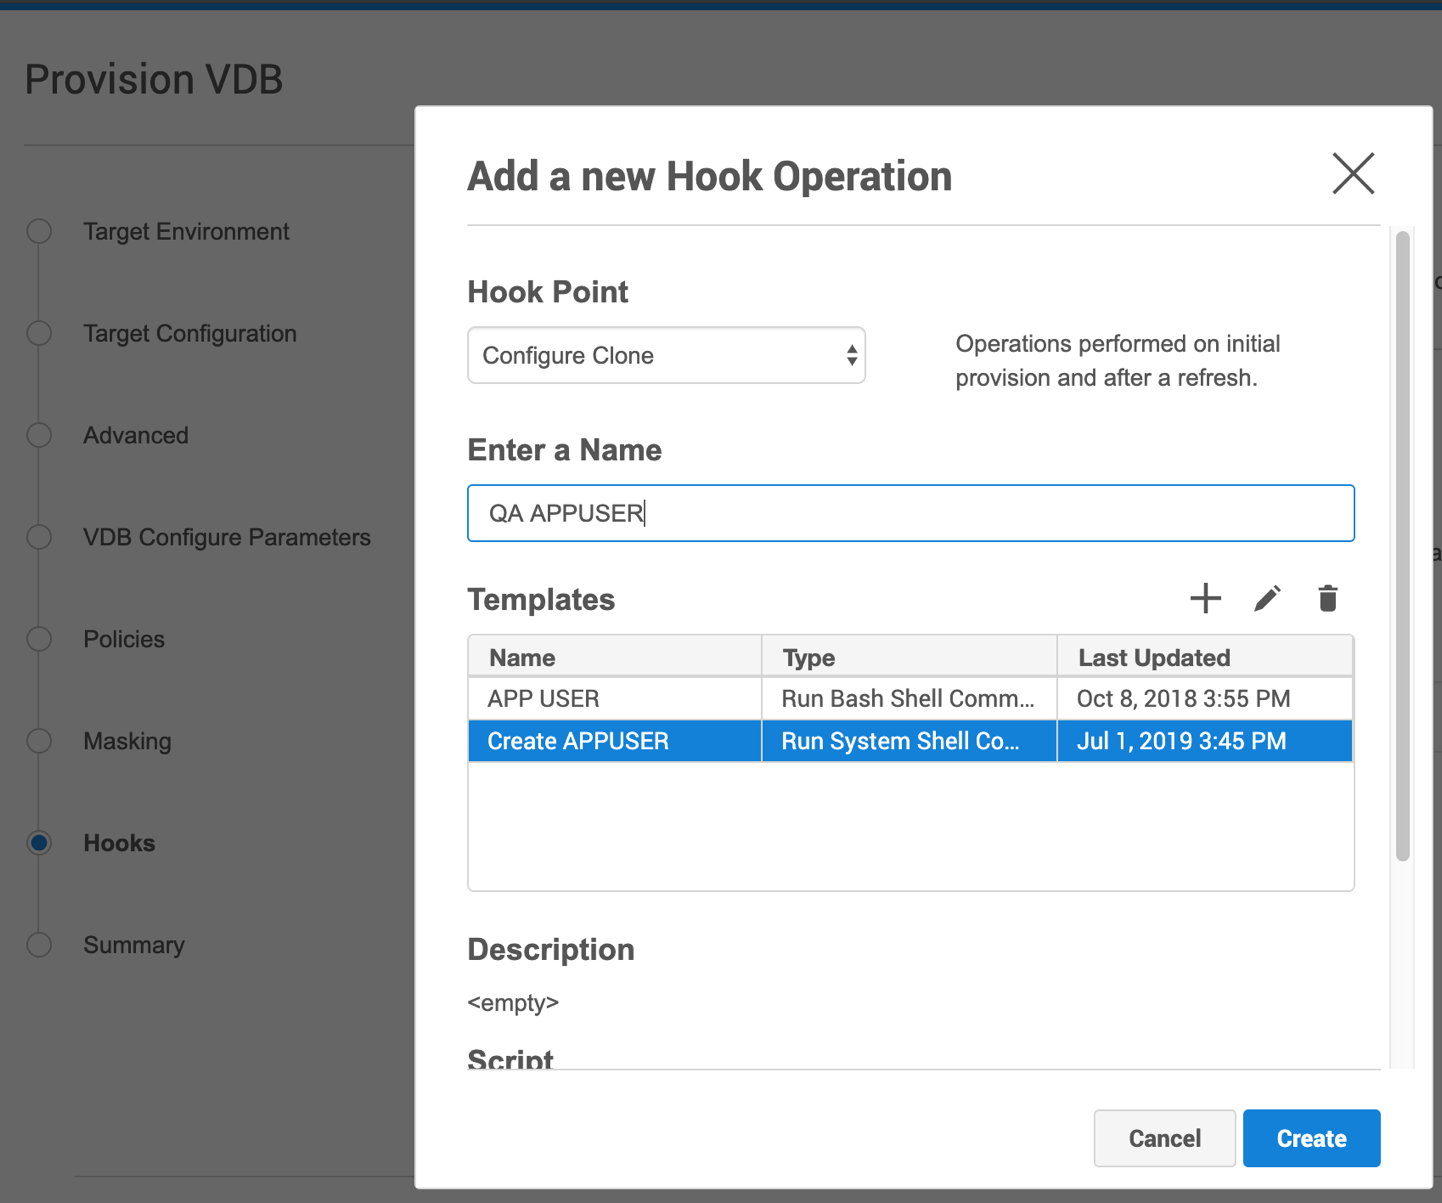
On the Hooks tab with Configure Clone already selected on the left side of the Provision VDB Wizard , click the plus sign to the right of the words Hook Points and select Create from Template from the drop-down list
- Enter a Name QA APPUSER for the Hook Operation
- Click on the Create APPUSER template we created earlier
-
Click the Create button
-
Click Next
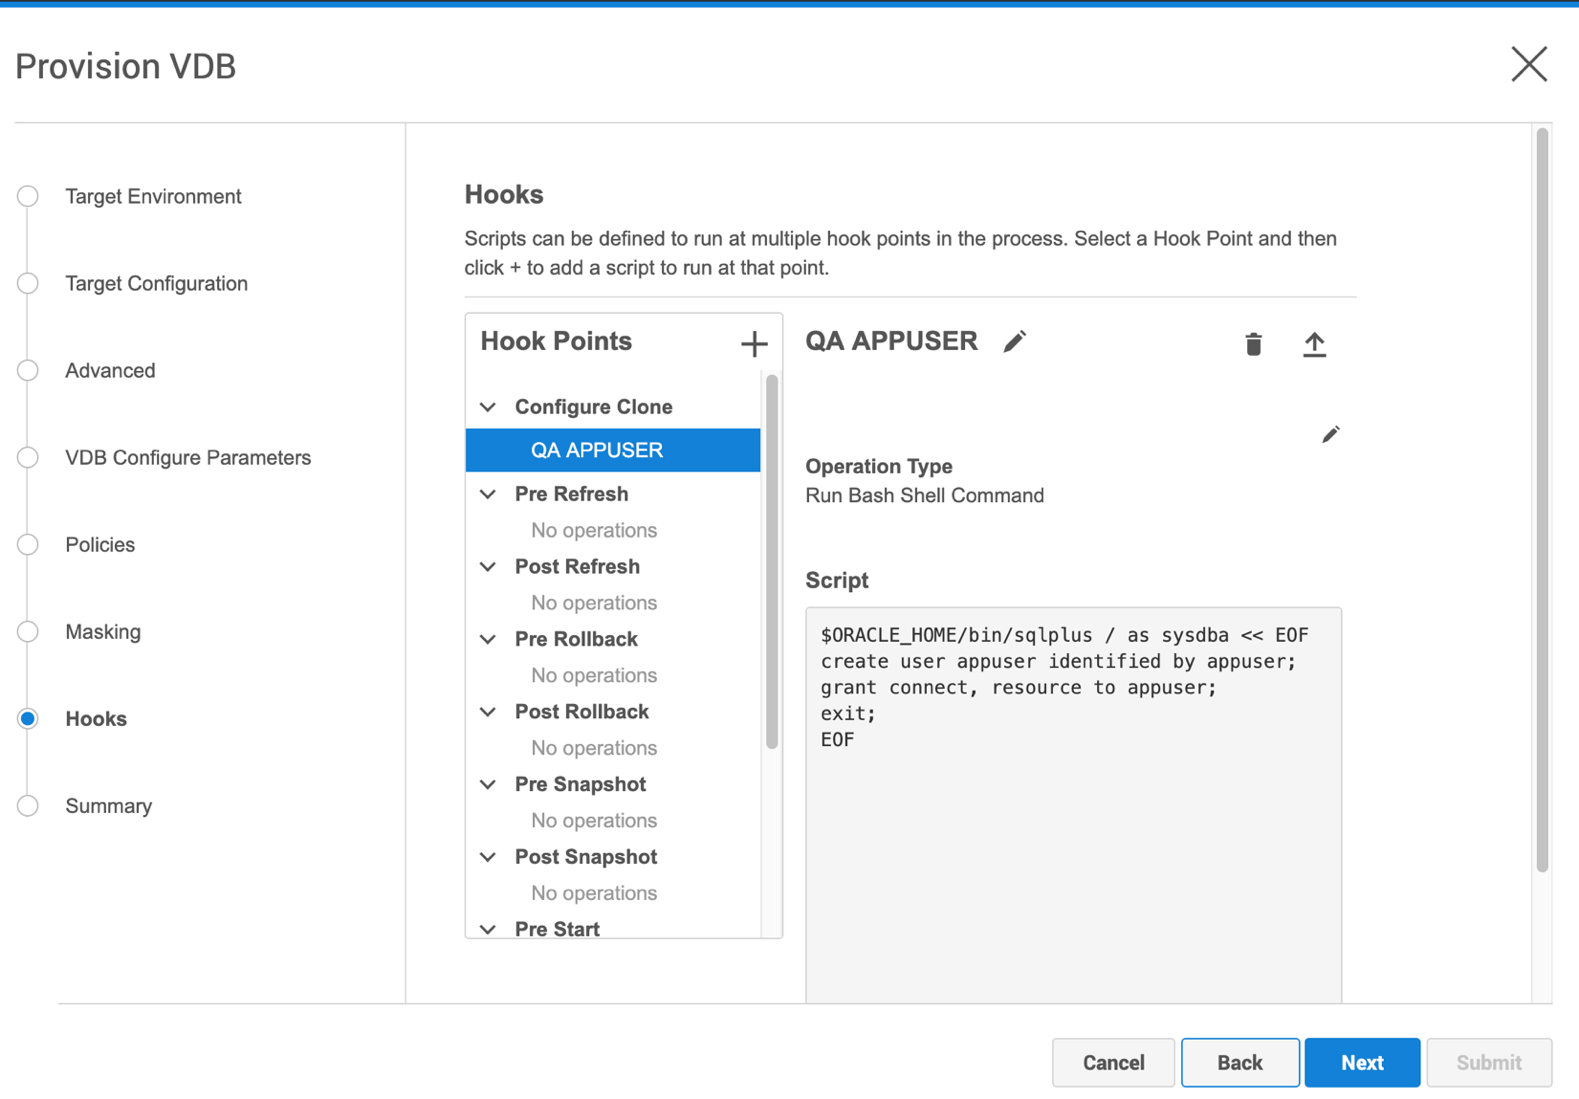
- Click Next
- Verify the summary information, and click Submit
Note: It may take a couple minutes for the VDB creation to complete. You can monitor the progress on the left-hand side of the screen next to the qadb object in the DB Targets group. On the Actions pane on the right-hand side of the screen, you should see the Provision virtual database "qadb" item move to the Recently completed pane without error.
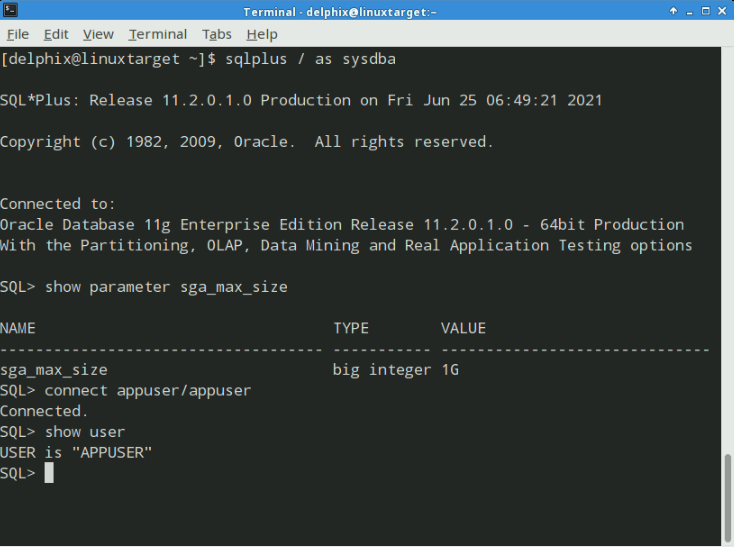
Once the VDB is created, you can verify that the VDB is operational by:
- Using Terminal on your lab server, use SSH to connect to your Linux Target server
- Type ssh 10.0.x.30 ('x' will be your Student Number ).
- Enter the username: delphix
- Enter the password: delphix
- Run the following commands:
- Type export ORACLE_SID=qadb
- Type export ORACLE_HOME=/u01/app/oracle/product/11.2.0/dbhome_1
- Type export PATH=$ORACLE_HOME/bin:$PATH
- Type sqlplus / as sysdba
- Type show parameter sga_max_size
- Type connect appuser/appuser
This will verify that the VDB is online with the VDB Configuration Template we specified, and that the APPUSER user was created by our hook.
Note: It may take a couple minutes for the VDB creation to complete. You can monitor the progress on the left-hand side of the screen next to the qadb object in the DB Targets group. On the Actions pane on the right-hand side of the screen, you should see the Provision virtual database "qadb" item move to the Recently completed pane without error. Once the VDB is created, you can verify that the VDB is operational by:
</br>
Optional Advanced Exercise – Discover and Link a 12c Container Database dSource
In this exercise, you will:
- Using the createDelphixDBUser script to create the c##delphix_db user in CDB$Root.
- Using the createDelphixDBUser script to create the delphix_db user in the PDB WINTERFELL
- Discover the 12C Database to identify pluggable database WINTERFELL
- Add a dSource for the PDB WINTERFELL
Steps
We will walk through the steps to get you acquainted with discovering 12C PDB's and creating a dSource from them.
- Using the Terminal icon on the Lab desktop connect to the Linux Source Server
- Type ssh 10.0.x.20 ('x' will be your Student Number ).
- Enter the password delphix
- Set the appropriate environment variables for the 12c Database and cd to the hostchecker directory :
- Type export ORACLE_HOME=/u02/app/oracle/product/12.2.0/dbhome_1
- Type export ORACLE_SID=gotcdb.
- Type export PATH= $ORACLE_HOME/bin:$PATH
- Type cd hostchecker
Note: If the hostchecker directory doesn't exist, untar the hostchecker_linux_x86.tar file (Type tar -xvf hostchecker_linux_x86.tar)
- Run the createDelphixDBUser Script to first create the c##delphix_db user in the CDB
- Type ./createDelphixDBUser.sh
- Enter the Database Instance enter : gotcdb
- When prompted to verify if you want to create the user in CDB#ROOT press Enter
- Enter the DB User name: c##delphix_db
- Enter password : delphix
- When prompted for select any dictionary privileges : n
The script will create the c##delphix_db user with necessary privileges.
- Run the createDelphixDBUser script again to create the delphix_db user in the PDB WINTERFELL
- ./createDelphixDBUser.sh
- When Prompted for the Database Instance enter gotcdb
- When Prompted for pluggable database name enter winterfell
- When Prompted for the Database User enter delphix_db
- When Prompted for the password use : delphix
- When prompted for select any dictionary privileges : n
The script will now create delphix_db user in the PDB winterfell with the necessary privileges.
Discover the CDB
If not already connected, connect to your Delphix Engine as Delphix Admin.
- Navigate to Manage -> Environments Page
- Select the Source Environment and click on the Databases Tab.
- Scroll down to find the home /u01/app/oracle/product/12.2.0/dbhome_1
-
Click on Discover CDB to discover the PDB's in the CDB
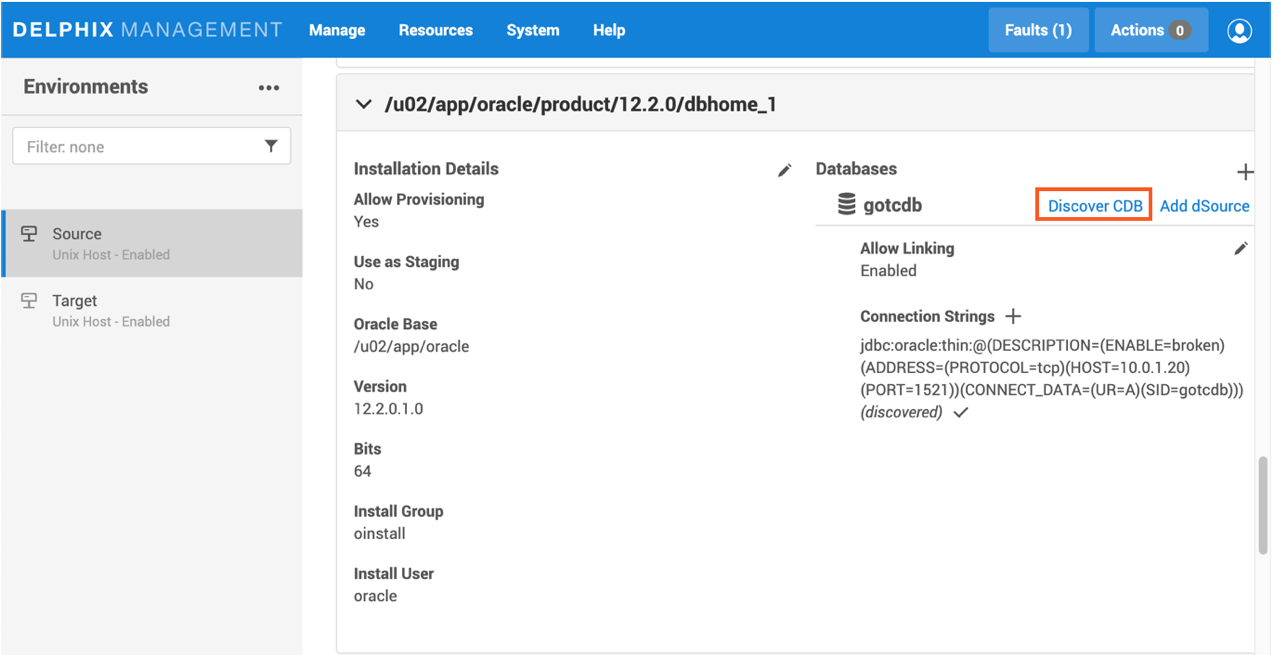
- On the Discover CDB wizard Popup Enter the following details
- Username: c##delphix_db
- Password: delphix
- Click on OK
- Click and monitor the Actions tab to ensure it completes without error.
Once complete, PDB WINTERFELL should be discovered and displayed under the 12c home
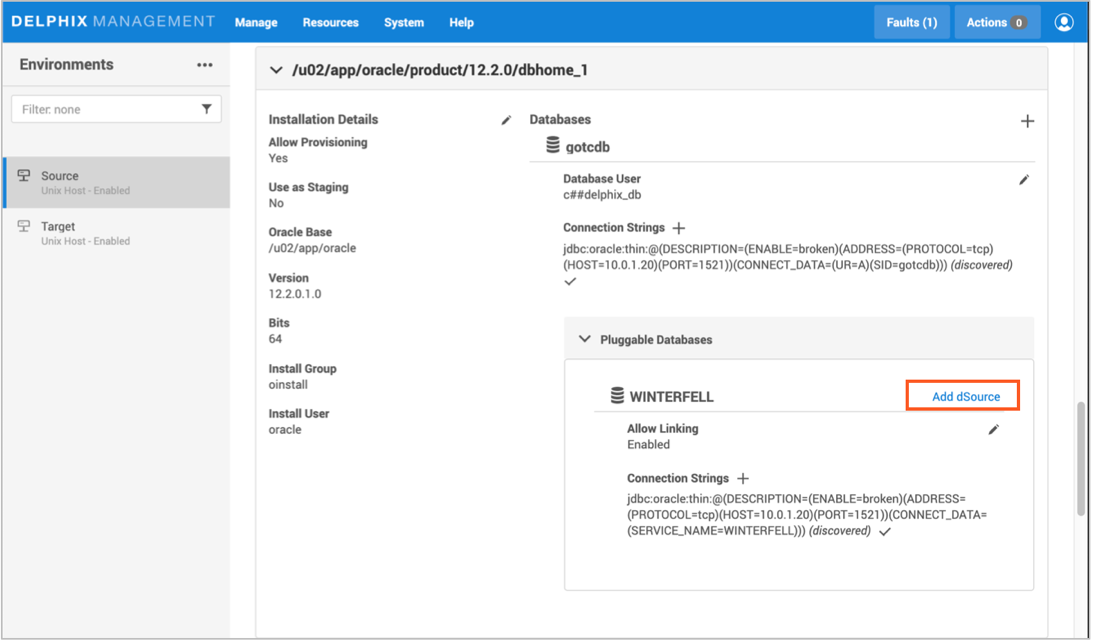
Link an Oracle 12c dSource
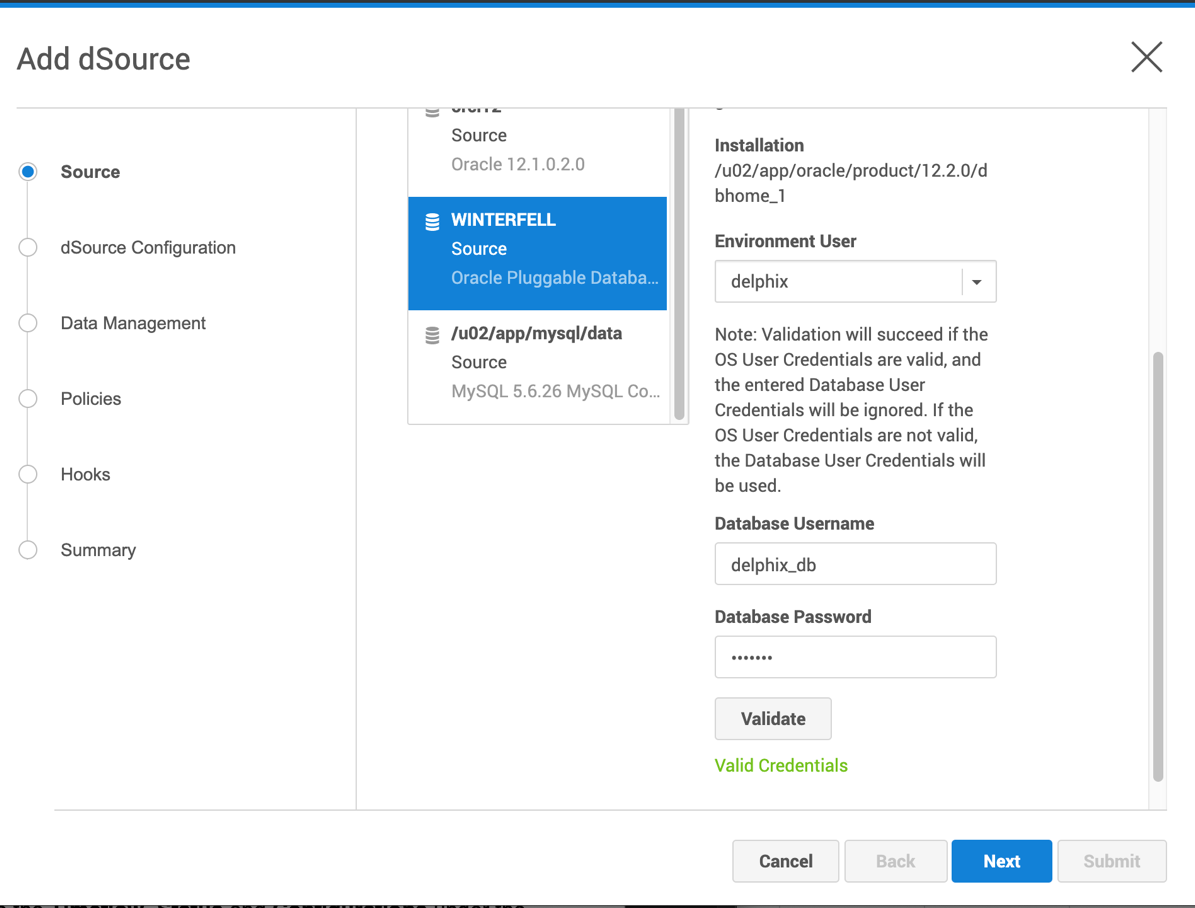
- Click on the Add dSource button to add a dSource from this database
- On the Add dSource Wizard make sure the PDB WINTERFELL is selected.
- Scroll down and add db user details
- DB Username: delphix_db
- DB Password: delphix
- Click on Verify credentials to verify the give details.
-
Click Next
- On the dSource Configuration tab of the Add dSource wizard Click on Add Dataset Group
- On the Add Dataset Group pop up, add a new group with the name Ora12C Sources.
- Click Add.
- Make sure the new dataset group is selected and click Next.
- Review and Accept the defaults on the Data Management tab by clicking Next
- Review the defaults on the Policies tab and click on Next.
- We will not be configuring hooks at this time. Click on Next.
-
Review Summary and Click Submit.
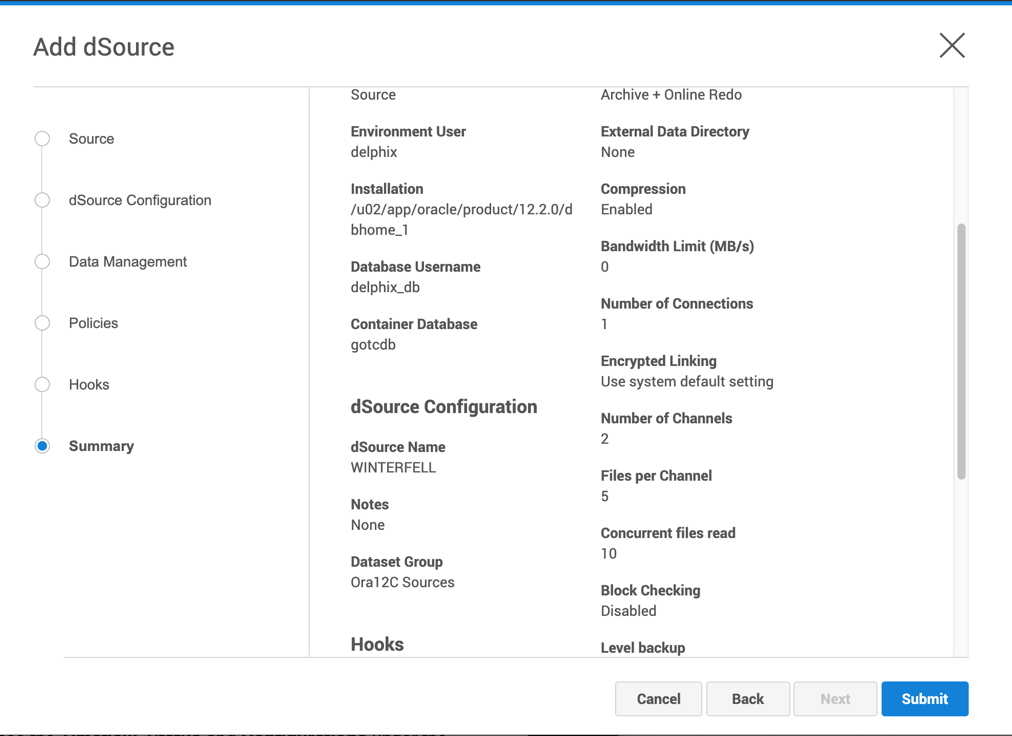
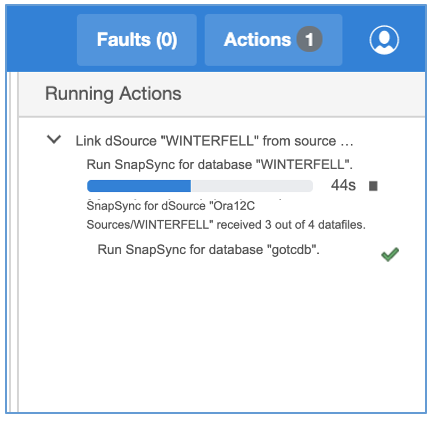
-
Click on Actions on the top right-hand corner if Actions Pane is hidden to monitor progress of the Action and ensure it completes without error.
- Once the dSource creation is completed Navigate to Manage -> Datasets.
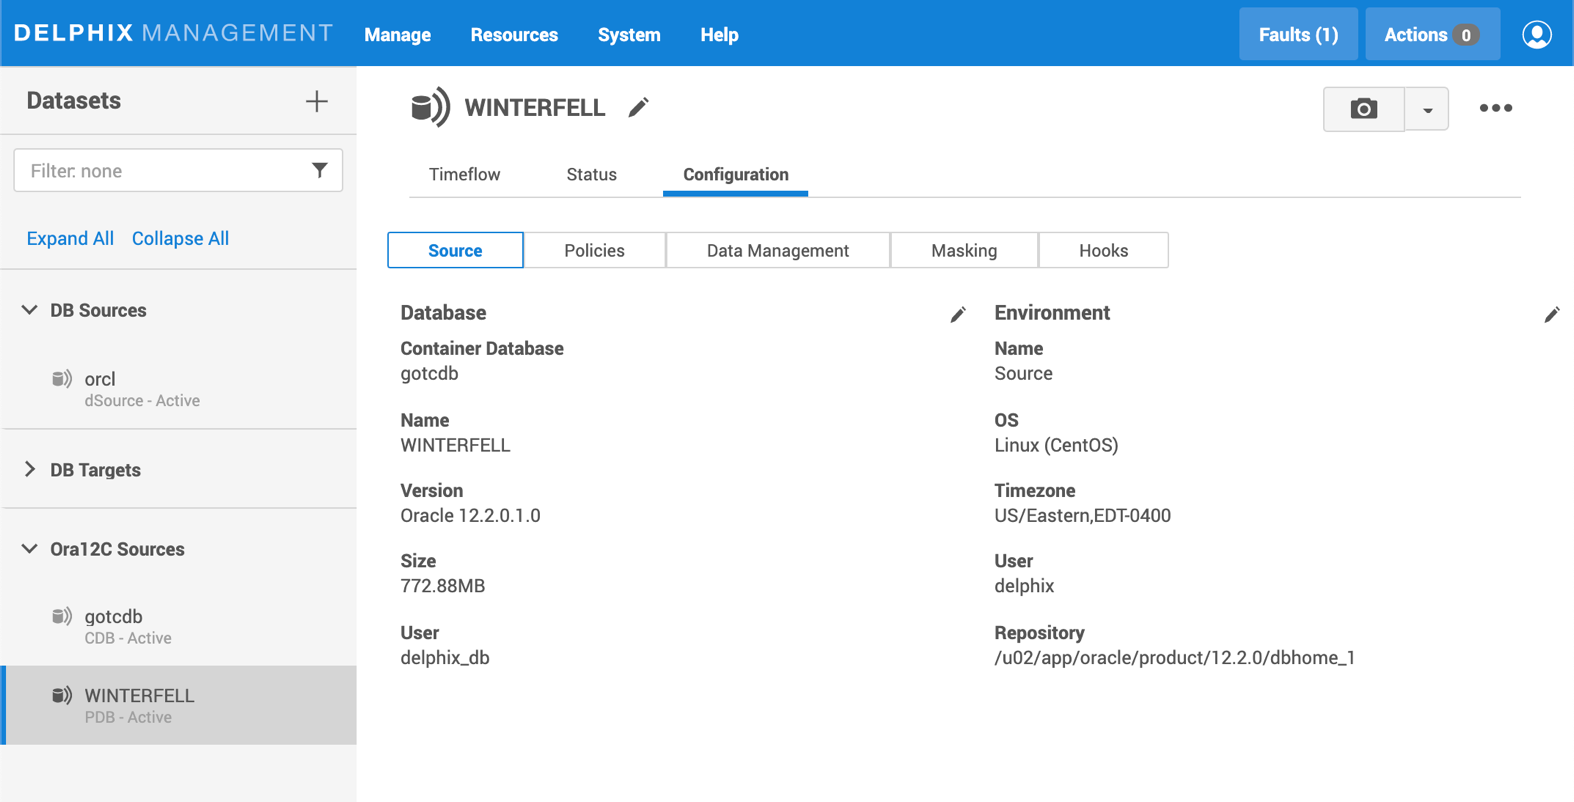
- Expand the Ora12c Sources group to explore the DB's under it. You should see both the CDB gotcdb and the PDB WINTERFELL listed under it.
- Note the Different icons used to represent CDB and PDB's
- Also note there is no timeflow available for the container database gotcdb.
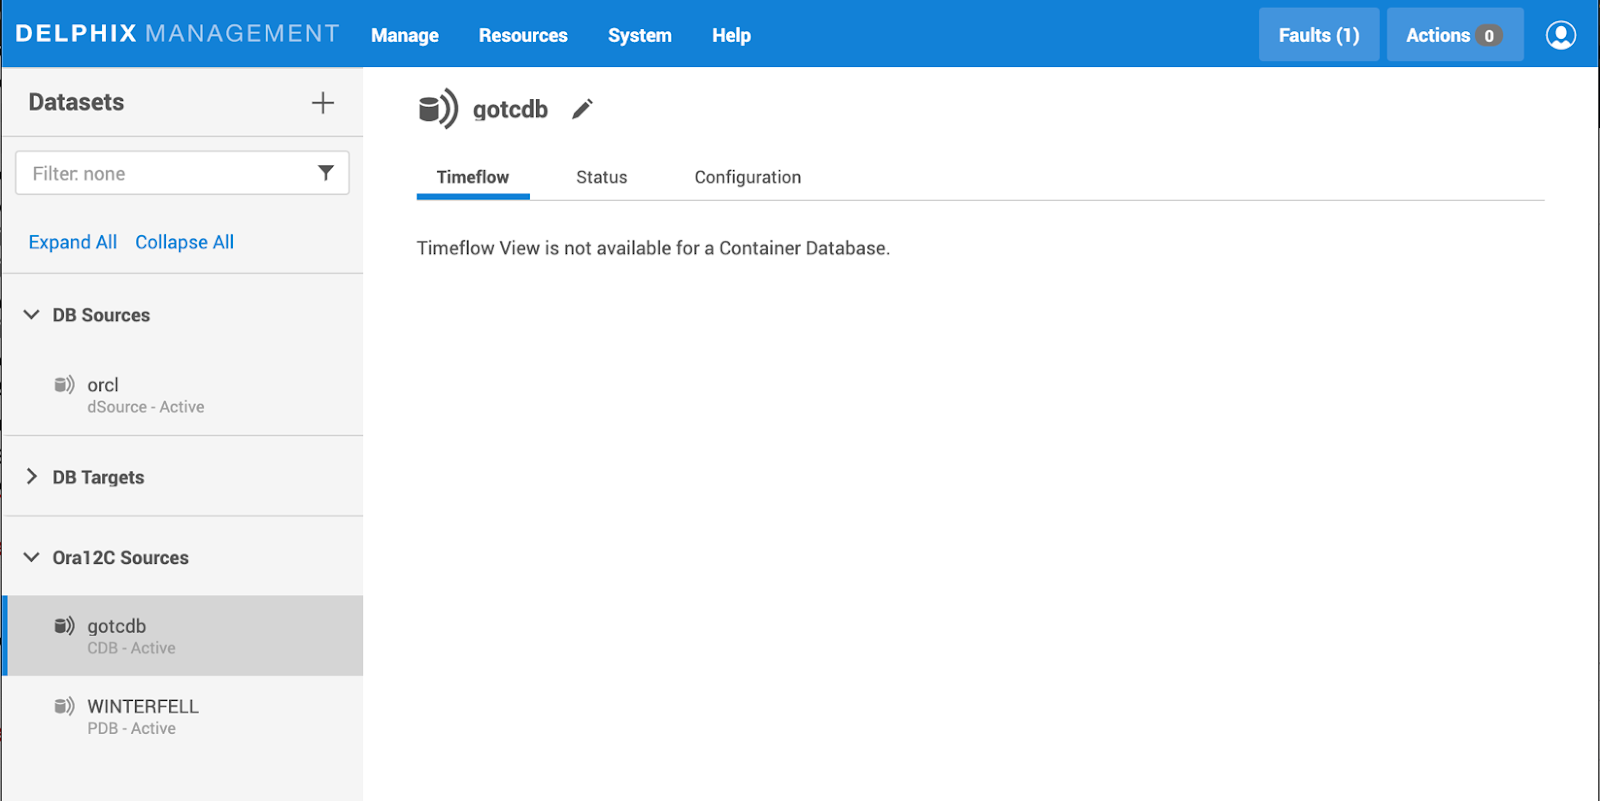
-
Click on the PDB WINTERFELL to see the Timeflow , Status and Configurations under the respective tabs.
</br>
Optional Advanced Exercise – Provision a Virtual PDB (vPDB)
In this exercise you will:
- Provision a VPDB from a 12c dSource.
Steps
As an advanced exercise, this lab has no corresponding Lab Solution. Instead, we will walk through the steps to get you acquainted with provisioning a PDB from a 12c dSource.
- Login to the Delphix Engine if not already logged in.
- Navigate to Manage -> Datasets
- Expand Ora12C Sources Group and click on WINTERFELL PDB
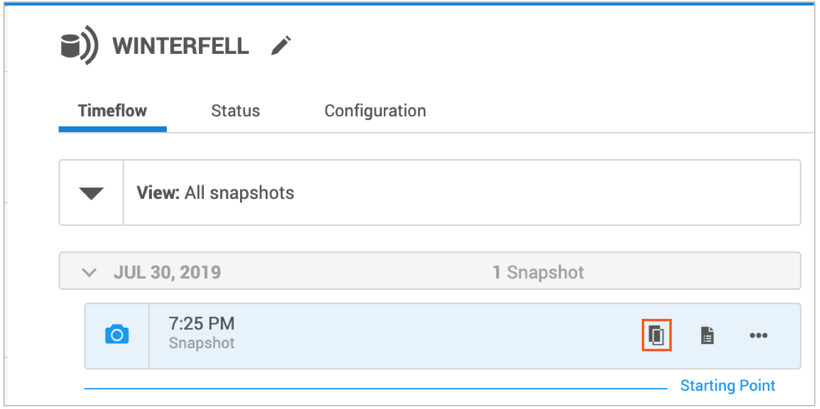
-
Hover on the latest snapshot card and click on Provision a VDB.
- On the Provision vPDB Wizard
- Click on Target under Environments.
- And click the check box for Create a New Container Database.
- Click Next.
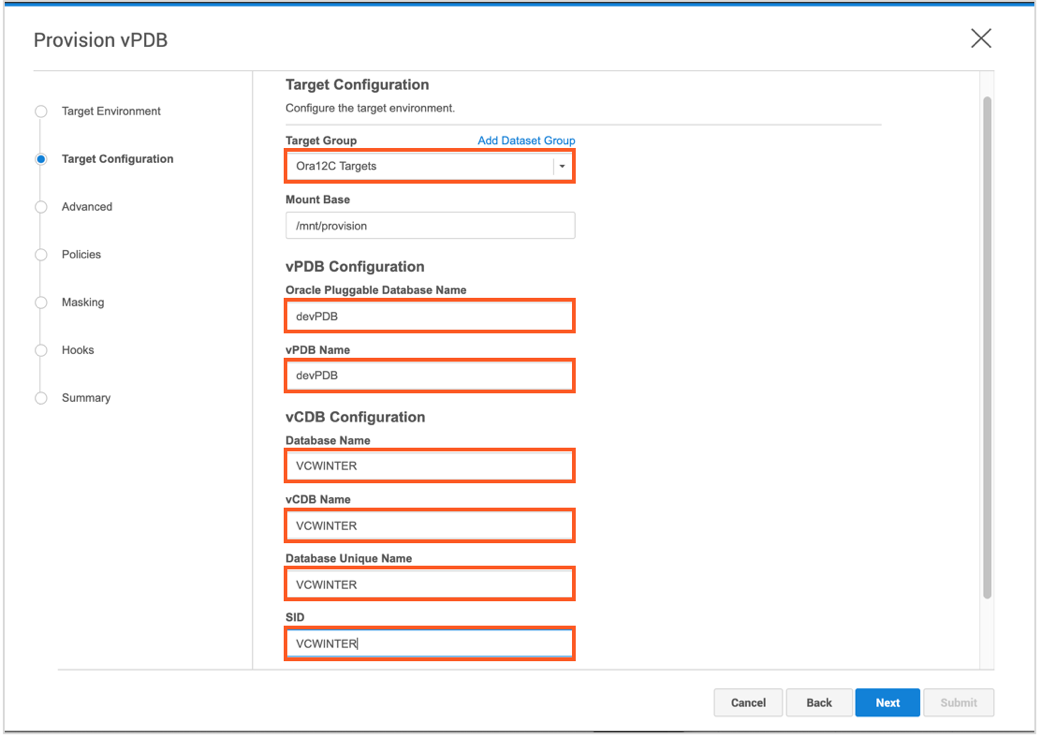
- On the Target Configuration tab click Add Dataset Group
- On the Add Dataset Group Wizard create a new group with the name Ora12C Targets.
- Click Add
- Back on the Target Configuration page make sure the new Dataset group Ora12C Targets is selected.
- Add the following details. (Database Name and SID limited to 8 characters).
- Pluggable Database Name : devPDB
- vPDB Name : devPDB
- Database Name: VCWINTER
- vCDB Name : VCWINTER
- Database Unique Name: VCWINTER
- SID: VCWINTER
-
Click Next.
- On the Advanced page click the Auto vCDB Restart Enabled checkbox
- Click Next
- Accept the Default policies. Click Next
- We will not be configuring hooks now. Click Next.
- Review the summary page and click Submit.
Note: Once Submitted, the Action will show a working screen for a few seconds. You can choose to let the Action run in the background.
-
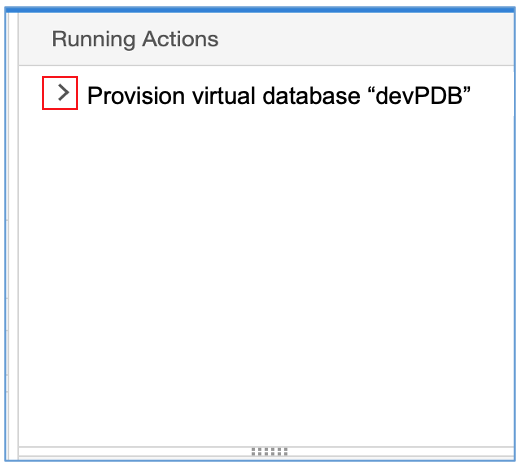
Monitor the Actions Pane by clicking on the Actions button on the top right-hand corner. You can get more details about the action by clicking on the >, to the left of the currently running action, to expand it.
Note: Once Action is completed you can see the vCDB we added and the VPDB just provisioned listed under the new Dataset group Ora12C Targets. Expand the group if necessary, to view the objects under it. Note that there is no timeflow for the vCDB.
-
Click on devPDB and review Timeflow, Status and configuration details under the respective tabs.

- Using the Terminal icon on your lab desktop connect to the target server. (Refer to the Important IP Addresses section of the labguide)
- Click on the Terminal icon on the lab desktop
- Type ssh 10.0.x.30 (replace # with the student number assigned to you).
- Set up the environment variables for 12C
- Type export ORACLE_SID=VCWINTER
- Type export ORACLE_HOME=/u02/app/oracle/product/12.2.0/dbhome_1
- Type export PATH=$ORACLE_HOME/bin:$PATH
- Connect to sqlplus and verify the CDB and PDB details
- Type sqlplus / as sysdba
- At the SQL> prompt type
- select name from v$database;
- alter session set container=DEVPDB;
- show CON_NAME
</br>
Optional Advanced Exercise – Measure Network Performance Test through the CLI
In this exercise, you will:
- Log into the Delphix Data Platform CLI as admin
- Perform a network latency test to Target
- Perform a network throughput test to Target
Steps
As an advanced exercise, this lab has no corresponding Lab Solution. Instead, we will walk through the steps to get you acquainted the Delphix CLI for admin.
- On your Lab Server desktop, double-click on Terminal
- Type: ssh admin@10.0.x.10 ('x' is your Student Number assigned by your instructor)
- If you receive a prompt asking you if you are sure you want to connect, enter: Yes
- Enter the password: delphix
- You are now at the root of the Delphix CLI as a Delphix Administrator
- Create a network latency test by typing: network test latency create
- List the default/required parameters by typing: get
- Set the remoteHost value to the TargetA environment IP address: set remoteHost=10.0.x.30 ('x' will be your Student Number )
-
Begin the test by typing: commit

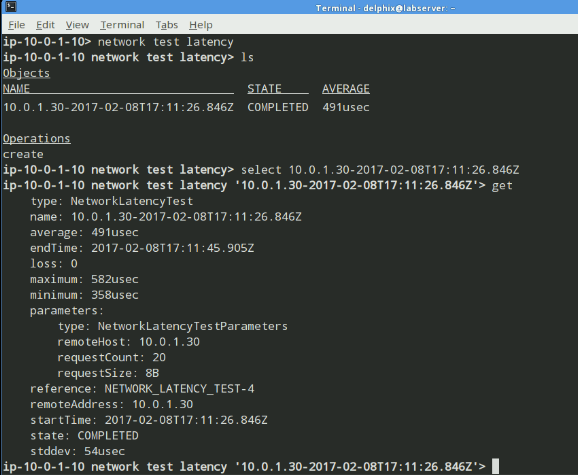
- View the results of the latency test:
- Get to the latency test section again by typing: network test latency
- List the completed tests by typing: ls
- Type select followed by the name of the test from the list. For example:
select 10.0.1.30-2015-09-18T12:47:19.711Z -
View the results of the test by typing: get
- Create a network throughput test
- While still logged into the CLI, return to the root by typing: cd /
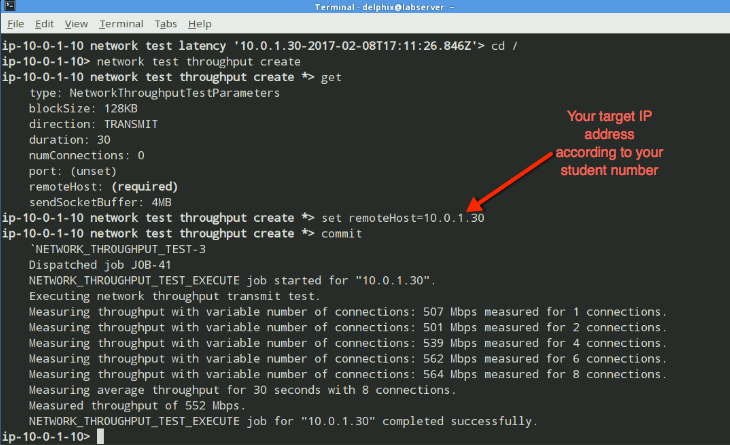
- Begin a network throughput test by typing: network test throughput create
- List the default/required parameters by typing: get
- Set the remoteHost value to the TargetA environment IP address: set remoteHost=10.0.x.30 ('x' will be your Student Number )
-
Begin the test by typing: commit
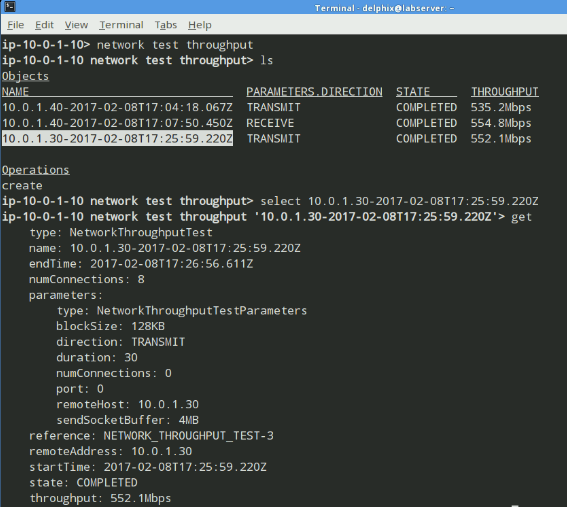
- View the results of the throughput test:
- Get to the throughput test section again by typing: network test throughput
- List the completed tests by typing: ls
- Type select followed by the name of the test from the list. For example:
select 10.0.1.30-2015-09-18T13:13:08.152Z -
View the results of the test by typing: get
</br>
Optional Advanced Exercise – Configure Delphix Replication
Note: This exercise is only possible if your classroom has been configured with 2 or more students.
In this exercise, you will:
- Set up a replication profile
- Replicate your entire Delphix Data Platform to another Delphix Data Platform
- View the replicas in the target Delphix Data Platform
Steps
As an advanced exercise, this lab has no corresponding Lab Solution. Instead, we will walk through the steps to get you acquainted the Delphix Replication capability.
- In the Delphix GUI, select System and then Replication on the top menu bar
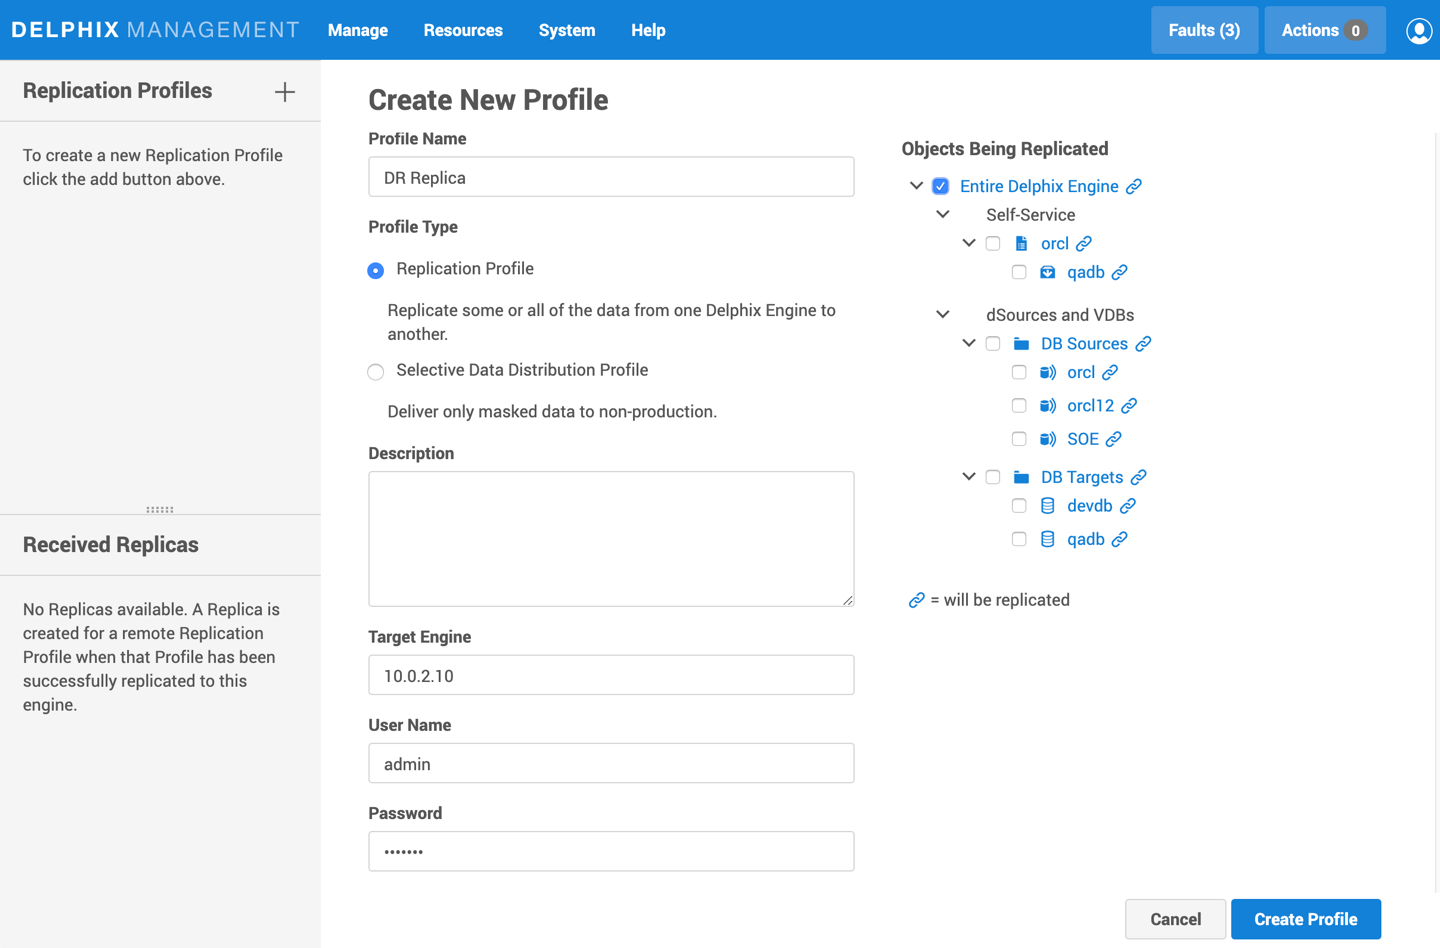
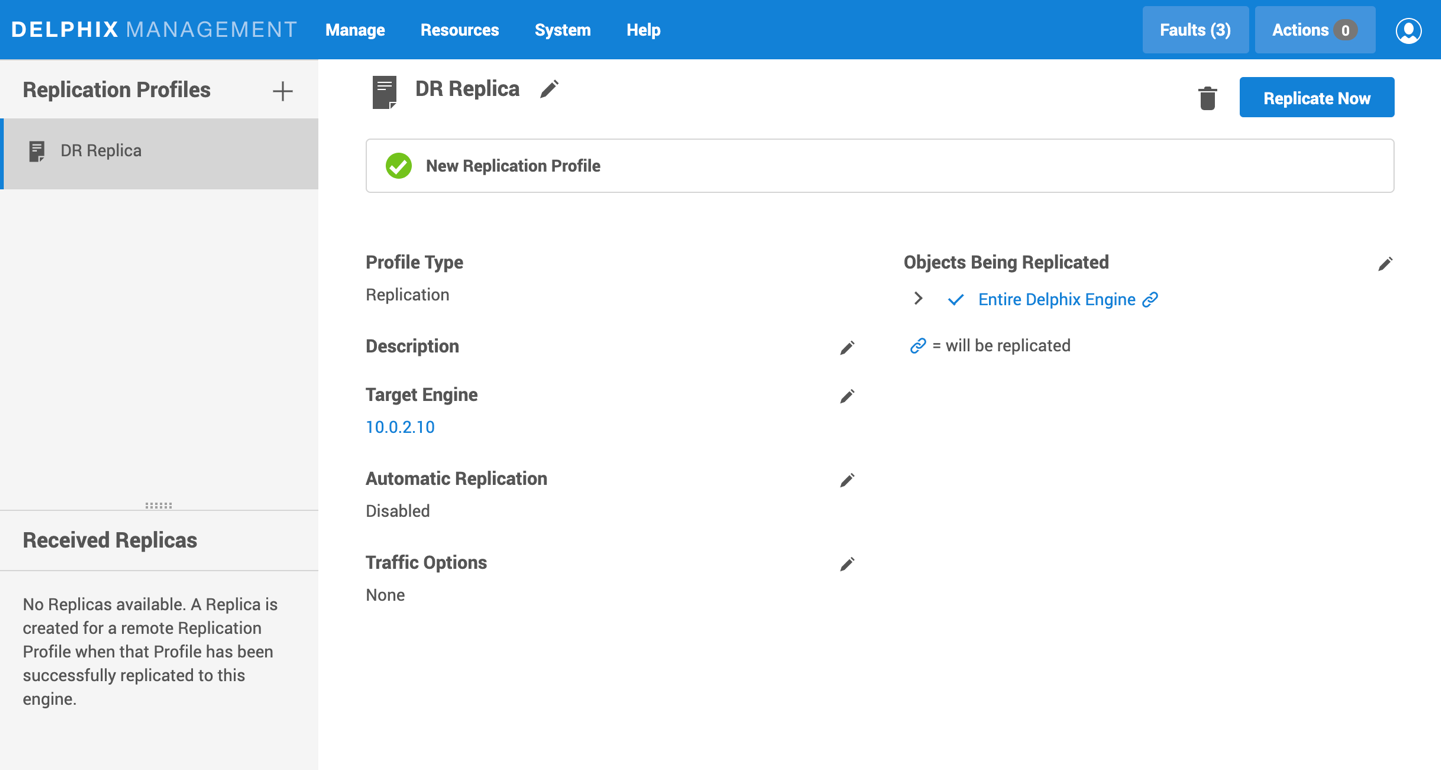
- Add a Replication Profile called DR Replica
- Click the plus sign next to Replication Profiles on the top left
- Enter a Replica Profile Name : DR Replica
- For Target Engine, enter the Delphix Data Platform IP address for the next student in your classroom environment. If you are the last student, use the Delphix Data Platform IP address for Student 1. For example, in a class with 3 students:
- Student 1 Delphix Data Platform is at 10.0.1.10, and they will replicate to 10.0.2.10
- Student 2 Delphix Data Platform is at 10.0.2.10, and they will replicate to 10.0.3.10
- Student 3 Delphix Data Platform is at 10.0.3.10, and they will replicate to 10.0.1.10
- Ask your instructor if you have any questions or confusion about this configuration.
- Enter the User Name: admin
- Enter the Password: delphix
- Do not enable Automatic Replication or configure Traffic Options
- For the Objects Being Replicated, select: Entire Delphix Data Platform
- Click Create at the bottom when ready.
- Start the Replication by clicking the Replicate Now button on the top right of your screen.
- Click Replicate to confirm you are ready to begin.
-
Once the initial full replication is complete, you will see a message stating Last Replication Successful.
- Check the results on your target Delphix Data Platform
- In your lab server browser, enter the IP address you used for the Target Engine in your replica profile. For example, if you are Student 1, your Delphix Data Platform is at 10.0.1.10, and your target would have been 10.0.2.10.
- Log in as user admin with the password delphix
- Observe the dropdown list under Datasets on the top left corner of your screen. It should have Default shown which is the default Namespace for Delphix replica targets.
- In order to see the replica objects, click on the dropdown list and select the second entry, which should reflect the hostname of the source Delphix Data Platform that sent the replica.
Note: The hostname shown in the labs is based on the default hostname given to the Delphix Data Platform in Amazon AWS, consisting of the prefix "ip" followed by the IP address separated by hyphens.
- While still logged into your target Delphix Data Platform, click on System and then Replication
- Observe the Received Replicas section at the bottom, indicating and verifying the target's receipt of replication data.
- Note: The Failover Now option will not work for these labs due to namespace collisions. This is an inherent outcome to plan for when using Active/Active replication.
© 2015 Delphix Corp. All rights reserved